Creating the Business and Presentation Layers
This chapter will cover the creation of the business and presentation layers. The business layer is where we apply various business information rules to our model. The presentation layer is what the report author will see in Report Studio, Query Studio, and Analysis Studio.
This chapter will cover the following topics:
- Specifying attributes
- Renaming columns
- Adding prompts
- Adding filters
- Adding calculations
- Adding formatting to data items
- Using folders and namespaces for grouping information
- Using shortcuts to include the same information in different places
By the end of this chapter, users will have created the business layer and extended the usefulness of their model by adding prompts, filters, calculations, and formatting to their model. Users will also have created the presentation layer ready to be used by report authors.
Creating the business layer
The Framework Manager modeler can make the job of the report author easier by incorporating business information rules into the model. These business information rules can be as simple as renaming the columns in the imported tables to give them more intuitive names, or setting specific formatting for the imported columns. To assist the report authors, we can add standard prompts for type-in values, and standard filters, which can be reused in many different reports. We can also add calculations so that the report author does not need to add these calculations into their reports.
Renaming columns
This is perhaps the simplest task we can perform, and is often overlooked, but is perhaps the most useful thing the modeler can do. In most imported relational databases, the column names will be in all capitals, perhaps with underlines separating the various elements of the column names. These column names do not make it obvious what the data in the column is used for. The first task of the modeler is to make these column names more meaningful for the report author.
NOTE
There are no specific rules for column names; the only thing to remember is that column name will be used as the default column name in reports.
To rename columns in your model, perform the following steps:
- Select the column to rename.
- Right-click on the column, and from the pop-up menu choose Rename.
- Enter the new column name.
Hiding columns
Sometimes your model contains columns that you do not want your report authors to see, probably because they do not show anything meaningful to the report author. It is useful to hide these columns so that the report author will not see them and include them in any reports.
The columns can simply be deleted from the model, but sometimes it is better to hide the columns in case they are needed in the future.
To hide columns in your model, perform the following steps:
- Select the column to hide.
- In the properties panel, locate the IsHidden property, and change the property to True.
NOTE
- It is possible to hide multiple columns at the same time.
- Select all the columns you want to hide and set the IsHidden property of the first item to True.
- Using the small down arrow below the IsHidden property, drag the property over all the remaining selected items.

Specifying attribute types
When you import relational data into your Framework Manager model, the attribute type for each imported column is set as follows:
Data type
|
Attribute type
|
Numeric items
|
Fact
|
Date
|
Identifier
|
Character
|
Attribute
|
Blob
|
Unknown
|
This does not suit all situations since columns on database tables are often numeric data types, but they should not be considered as facts as they may be identifiers or attributes, and if they are left as facts, this may have unexpected results when they are used in reports. For example, Report Studio may total up these attribute columns to give a meaningless number. It is therefore necessary to review and set the correct attribute types of all imported data items to ensure they are set correctly.
Attribute types are specified in the properties of an item.
TIP
Expand the properties pane before working with a property's attribute types.
- Select the data item.
- In the properties pane, locate the Usage property.
- Click on the attribute label, and from the drop-down list, select the appropriate attribute from the following:
- Fact
- Identifier
- Attribute
- Unknown
NOTE
If you select multiple items, you can easily set the Usage Property setting for all the selected items by changing the Usage setting for the first item and then dragging the usage over all the remaining items by selecting the small down arrow below the changed usage property.

Adding filters
A filter is an expression that provides the conditions that rows must meet to be retrieved for the query subject of the report to which the filter is applied.
There are two types of filters that can be added to your Framework Manager model:
- Embedded filters
- Standalone filters
EMBEDDED FILTERS
Embedded filters are created within individual query subjects and they will only have an effect on the query subject within which they are embedded.
TIP
If you use embedded filters in a query subject, they should be added to the import layer.
Creating an embedded filter
To create an embedded filter, perform the following steps:
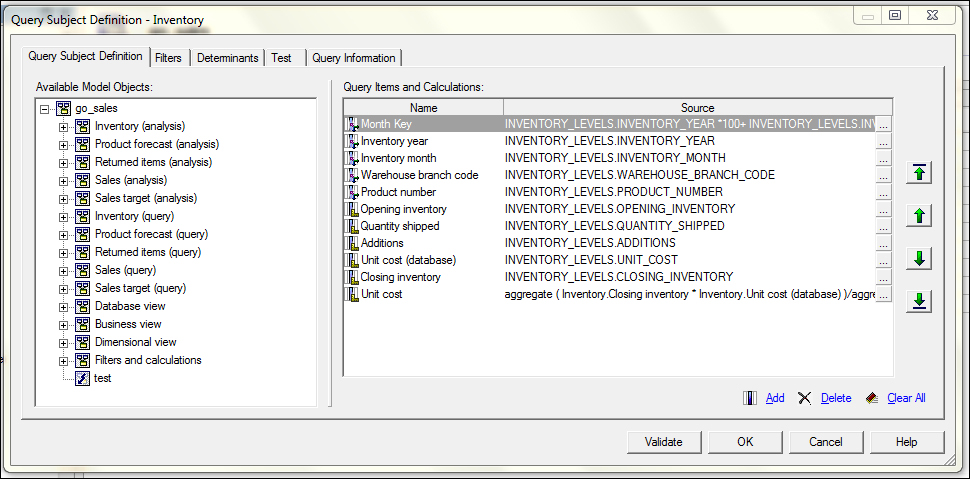
- Double-click on the query to which the filter is to be added. This will open the Query Subject Definition - Inventory dialog box:
- Select the Filters tab:
- Click on Add to add your filter definition.
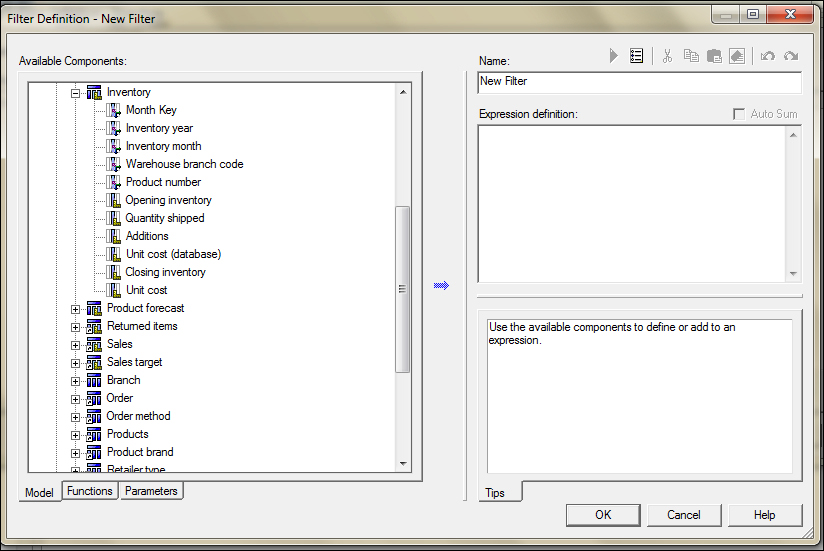
- Give your filter a name if required—the default name will be New Filter.
- From the Available Components box, drag-and-drop items into the Expressions definition box.
- If you need to use functions or parameters, click on the corresponding tab in the Available Components box and you can select the functions or parameters to use.
- As you drag-and-drop the items into the Expression definition box, the expression will be validated and error messages will appear in the Tips box.
- Once a valid filter expression has been created in the Expression definition box, click on theOK button to confirm your filter.
- Click on the OK button in the query definition dialog to confirm the query.


STANDALONE FILTERS
Standalone filters are filters that are available across the model. They are commonly used to make filters available to report authors, but can also be used to filter multiple query subjects within the model.
Creating a standalone filter
To create a standalone filter, perform the following steps:
- Select the location where you want to create your filter.
- Right-click on the location and from the pop-up menu, choose Create | Filter, or from the menu choose Action | Create | Filter.
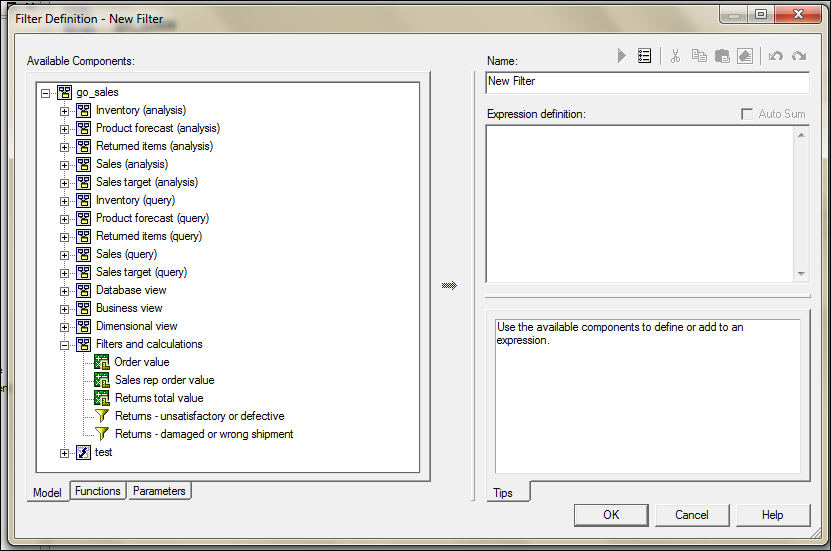
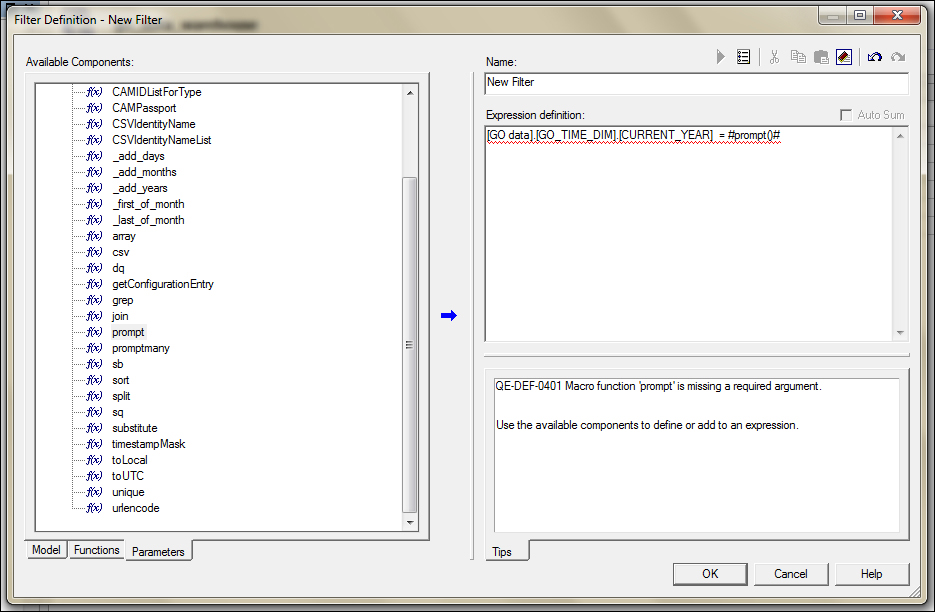
- This will show the Filter Definition dialog:
- Give your filter a name—the default name will be New Filter.
NOTE
- Since this is a standalone filter, which is available to report authors, the name should help identify the purpose of the filter, for example, Returns, Unsatisfactory, and Invalid Orders.
- From the Available Components box, drag-and-drop items into the Expressions definitionbox.
- If you need to use functions or parameters, click on the corresponding tab in the Available components window and select the function or parameter to use.
- As you drag-and-drop the items into the Expression definition box, the expression will be validated and error messages will appear in the Tips box.
- Your filter must result in a Boolean (true or false) result; an example of a valid expression is [GO data].[GO_TIME_DIM].[CURRENT_YEAR] = 2004.
- Once a valid filter expression has been created in the Expression definition box, click on theOK button to confirm your filter.
Adding calculations
You can create calculations to provide your report authors with regularly used calculated values. The calculations can use any query items, parameters, other calculations, and functions that are available within the model.
TIP
Do not use characters that are commonly used for expression operators for your calculation's name; for example, a calculation named Rate * 10 may cause errors when used in an expression such as [Rate * 10] < 20.
There are two types of calculations that can be added to your model:
- Embedded calculations
- Standalone calculations
EMBEDDED CALCULATIONS
To create a calculation that is specific to a single query subject or dimension, you can embed the calculation directly in that object.
TIP
It is recommended that you apply calculations in model query subjects wherever possible, since this makes maintenance easier.
Creating embedded calculations
Embedded calculations are usually part of a query. To create an embedded calculation, perform the following steps:
- Double-click on the query subject to which you want to add the calculation.
- Click on the Add button:
- Give your new query item a name—the default name is New Query Item.
- Drag-and-drop components from the Available Components box into the Expression definition box.
- As components are dragged, the Tips box will show validation errors.
- You may drag items from the Functions and Parameters tabs in the Available componentsbox.
- Once you have a valid expression, select the Results tab below the Expression definition box, and click on the small blue triangle above the Name box.
- A sample of the calculation's results will be displayed in the Results tab below the Expression definition box.
- When your expression is valid, click on OK to confirm.
- Click on OK to confirm your changes to the query definition.
STANDALONE CALCULATIONS
When you need to do aggregation before performing the calculation, create a standalone calculation. Change the Regular Aggregation property of the calculation to Calculated.
TIP
Create a folder to hold all your standalone calculations so that they can be easily found by report authors.
Creating standalone calculations
Standalone calculations are not related to any query. To create a standalone calculation, perform the following steps:
- Select where to create the calculation.
- Right-click on the location and choose Create | Calculation, or from the menu choose Action |Create | Calculation.
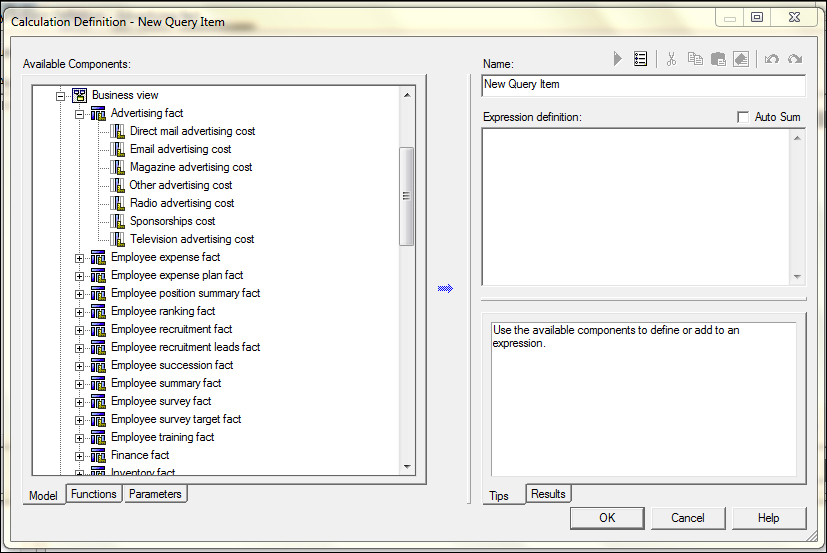
- This will show the Calculation Definition dialog.
- Drag-and-drop items from the Available components box into the Expression definition box.
- When the expression definition is complete, click on OK to confirm.
Adding prompts
Prompts are generally defined in reports, but they can also be defined in the model. This is useful for items that are not shown on the report, but are used only for filtering data.
Prompts are a special type of filters. You add your prompts in the same way as you add filters to your model.
TIP
Since the prompts are being made available to your report authors, you should create them as standalone filters, and put them with your other standalone filters.
- Select where you are going to create your prompt.
- Right-click on the location and choose Create | Filter, or form the menu choose Action | Create| Filter.
- Create your prompt filter by dragging items from the Available components box.
- When you create a prompt, your expression will look slightly different to the expressions you use in normal filters, a prompt filter example is [GO data].[GO_TIME_DIM].[CURRENT_YEAR] = ?Year?.
- When this prompt filter is used, the report user will be prompted for Year.
- When your prompt filter is complete, click on OK to confirm.
CREATING PROMPTS WITH MACROS
In Chapter 3, Importing Data Sources, in the section Importing Stored Procedures, we added promptsto a stored procedure using some of the available macros within Framework Manager. We can use these same macros to create other prompts in our Framework Manager model. To create prompts using Prompt macros, perform the following steps:
- Select where you are going to create your prompt.
- Right-click on the location and choose Create | Filter, or from the menu choose Action | Create| Filter.
- Create your filter by dragging items from the Available Components box.
- Select the Parameters tab in the Available Components box.
NOTE
- The prompt macros are Prompt and PromptMany. When you select the macro to drag it to the Expression definition box, the tip box will display details about the format of the parameter.
- Drag the Prompt macro from the Available Components box.
- We need to add some additional items to our macro, and the end result should be [GO data].[GO_TIME_DIM].[CURRENT_YEAR] = #prompt('Year', 'Integer' )#.
NOTE
We can make the prompt required or optional by using some of the additional parameters for the macro function.
The complete definition for the prompt macro is as follows:
prompt (prompt_name,datatype,defaultText,text,queryItem,trailing_text )
prompt_name is required. The datatype defaults to string when it is not specified. The prompt is optional when defaultText is specified. text, when specified, will precede the value. queryItem can be specified to take advantage of the prompt information properties ofqueryItem. trailing_text, when specified, will be appended to the value. When thedefinition is complete, click on OK to confirm.
Adding formatting
It is possible to add specific formatting properties to any column that has been imported into Framework Manager. This will save the report author from having to set the formatting in his/her reports.
DATA FORMATTING PROPERTIES
The following is a list of properties available in the data formatting dialog:
- Text
- Number
- Currency
- Percentage
- Date
- Time
- Date/Time
- Time Interval
- Custom
When choosing one of these format types, a specific set of properties is available.
USING FORMATTING PATTERNS
Sometimes, the available formatting does not provide the formatting required for a particular situation, so each of the format types allows you to specify a formatting pattern to use.
For example, you can format dates to use full text including the era, or you can format them to only use numbers and show the last two digits of years to save space.
Using symbols and patterns can provide similar results as basic data formatting tasks. For example, you can set how many digits appear after the decimal point. You can achieve these types of results with a pattern, or you can set the No. of Decimal Places property. The formatting patterns allow greater flexibility for more complex formatting requirements.
When you define a formatting pattern, the number of symbols used will affect how the data is presented. There are different rules for text, numbers, and values that can be text or numbers, such as dates.
You can specify whether text is produced in full or in an abbreviated form. The following table shows the effect of the number of formatting symbols on how data is formatted:
Number of symbols
|
Meaning
|
Example
|
4 or more
|
Full text form
|
EEEE produces Monday
|
Less than 4
|
Abbreviated form
|
EEE produces Mon
|
The number of symbols used in the pattern sets the minimum number of digits that are shown in a report. Number that has fewer digits than specified will be zero padded; for example, if you specify a format mm for minutes and the database value is 6, the report will show 06.
For values that can be text or numbers, such as months, you can use the formatting pattern to specify whether numbers or text are printed, and whether the month names are abbreviated or not. This is shown in the following table:
Number of symbols
|
Meaning
|
Example
|
3 or more
|
Text
|
MMMM produces February
MMM produces Feb
|
Less than 3
|
Numbers
|
MM produces 02
M produces 2
|
When using pattern formatting with date and time symbols, the following patterns are available for individual date components:
Meaning
|
Symbol
|
Presentation
|
Example
|
Era
|
G
|
Text
|
AD
|
Year
|
y
|
Number
|
1996
|
Year (of Week of Year)
|
Y
|
Number
|
1996
|
Month in year
|
M
|
Text and number
|
July and 07
|
Week in year
|
w
|
Number
|
27
|
Week in month
|
W
|
Number
|
2
|
Day in year
|
D
|
Number
|
189
|
Day in month
|
d
|
Number 10
| |
Day of week in month
|
F
|
Number
|
2 (2nd Wed in July)
|
Day of Week (1=first day)
|
e
|
Number
|
2
|
Day in week
|
E
|
Text
|
Tuesday
|
a.m. or p.m. marker
|
a
|
Text
|
pm
|
Hour in day (1 to 24)
|
k
|
Number
|
24
|
Hour in a.m. or p.m. (0 to 11)
|
K
|
Number
|
0
|
Hour in a.m. or p.m.(1 to 12)
|
h
|
Number
|
12
|
Hour in day (0 to 23)
|
H
|
Number
|
0
|
Minute in hour
|
m
|
Number
|
30
|
Second in minute
|
s
|
Number
|
55
|
Millisecond
|
S
|
Number
|
978
|
Time zone
|
z
|
Text
|
Pacific Standard Time
|
Escape used in text
|
'
|
n/a
|
n/a
|
Single quote
|
''
|
n/a
|
'
|
When using pattern formatting for decimal numbers, the following formatting patterns can be used:
Symbol
|
Meaning
|
0
|
A digit that is shown even if the value is zero.
|
#
|
A digit that is suppressed if the value is zero.
|
.
|
A placeholder for decimal separator.
|
,
|
A placeholder for thousands grouping separator.
|
E
|
Separates mantissa and exponent for exponential formats.
|
;
|
Separates formats for positive numbers and formats for negative numbers.
|
-
|
The default negative prefix.
|
%
|
Multiplied by 100, as percentage.
|
‰
|
Multiplied by 1000, as per mille.
|
¤
|
The currency symbol. If this symbol is present in a pattern, the monetary decimal separator is used instead of the decimal separator.
|
¤¤
|
The international currency sign. It will be replaced by an international currency symbol. If it is present in a pattern, the monetary decimal separator is used instead of the decimal separator.
|
X
|
Other characters that can be used in the prefix or suffix.
|
'
|
Used to quote special characters in a prefix or suffix.
|
/u221E
|
Infinity symbol.
|
ADDING FORMATTING
Before setting formats, you may find it useful to expand the Properties pane to see more details, or show multiple items.
- Select the column you want to format.
- In the properties pane, click on the Format property and then click on the text labelled <click to edit>.
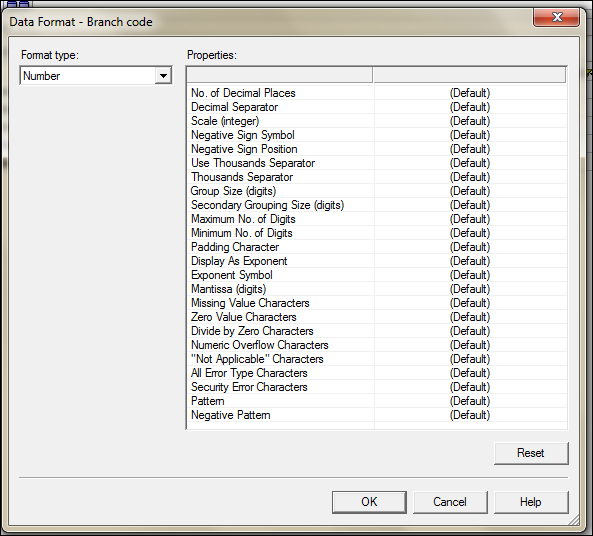
- This will bring up the Data Format dialog box:
- In the Format type box, select the predefined format type.
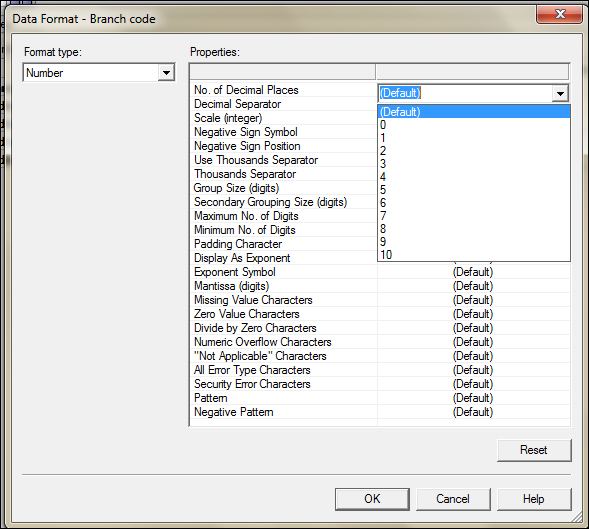
- Change the formatting properties as required.
- Formatting patterns may be set by selecting the Pattern property and entering the appropriate pattern.
- When all formatting properties are set, click on the OK button to confirm the formatting choices.


TIP
You can set the formatting of multiple items by selecting them all, changing the format for the first item in the list, and then dragging the format over all the remaining items by selecting the small down arrow below the changed format property.
Very nice post,Keep updating.
ReplyDeletecognos tm1 training
cognos tm1 online training
learn cognos tm1 course