Modeling Dimensional Data
This chapter will cover the use of dimensional modeling, which is more correctly called Dimensionally Modeled Relational (DMR) data. The dimensional models created can be used with IBM Cognos Analysis Studio, and also with the other studios.
In this chapter we will cover the following:
- Creating regular dimensions
- Creating regular dimensions with multiple hierarchies
- Creating measure dimensions
- Creating scope dimensions
By the end of this chapter, you will be able to create a dimensional data model using relational data sources.
Dimensional modeling is the name for a set of techniques and concepts used in data warehouse design. Dimensional modeling is based on the concepts of dimensions (or context) and facts (or measures). Dimensions are groups of hierarchies and descriptors that define the facts; facts are typically numeric values that can be aggregated.
Dimension modeling is one of the functions available within Framework Manager. With the dimensional modeling capability you can create dimensions with hierarchies at different levels, and facts with multiple measures. You can then create a scope relationship between the measures and facts.
DMR packages can be used in Analysis Studio, Query Studio, and Report Studio. They enable drilling up and drilling down within the reports, and give access to the member functions within the Report Studio.
The data layer forms the basis for modeling your dimensional data.
You do not create joins between your dimensions and facts. Instead you create the joins on the query subjects in the data layer and then create a scope relationship between the dimensions and the facts.
NOTE
Following the principles of proven practice, create your dimensions in a separate dimensional layer of your model.
Regular dimensions
A regular dimension contains one or more user-defined hierarchies, with each hierarchy consisting of the following components:
- Levels: These are used to roll-up measures
- Keys: Each item in a level must have a unique key defined
- Captions: These are used as labels for the levels
- Attributes: These contain additional information regarding the levels
Every regular dimension requires that each level has a key and a caption specified, and that the caption be a string data type.
Regular dimensions are based on data source or model query subjects that have already been defined in your model.
Creating a regular dimension
We will create a time dimension using the great_outdoors_warehouse from the IBM Cognos Samples. From the model, we will use the Time query from the Business view item as a relational data source to build our regular dimension.
Create your regular dimension as follows:
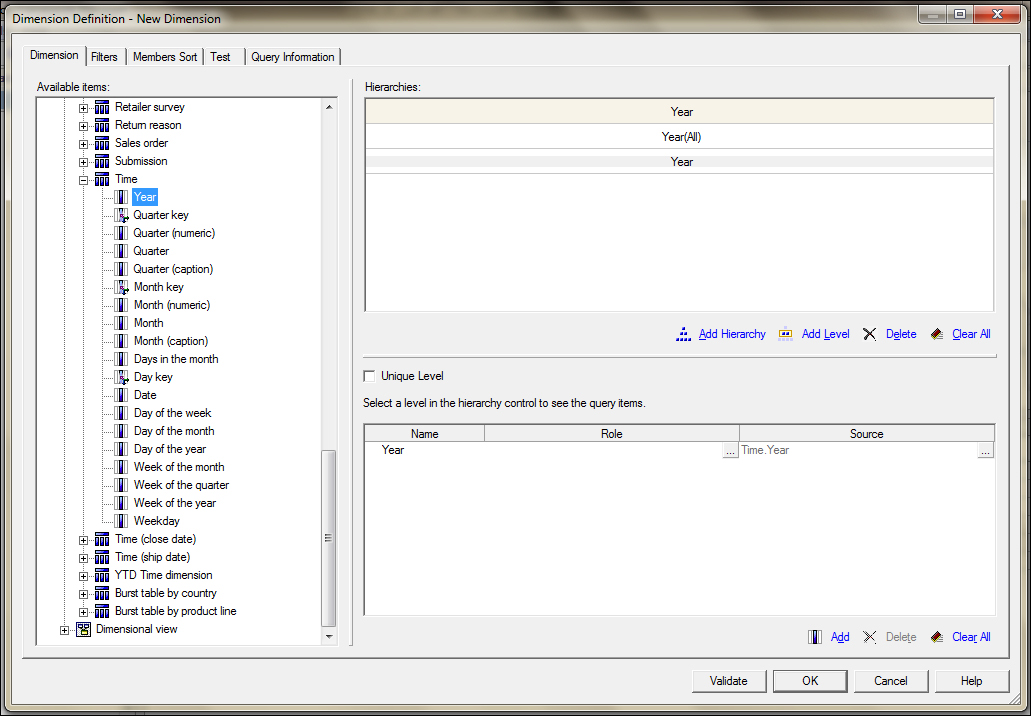
- Right-click on your namespace, and navigate to Create | Regular Dimension, or alternatively click on your namespace and from the Actions menu, navigate to Create | Regular Dimension. This will show the dimension definition dialog box as follows:
- Expand the Business view item to locate and expand the Time query:
- Drag-and-drop the Year item from the Available items into the Hierarchies panel:
- In the lower-right panel under the Role heading click on the ellipsis (…) button, and from the pop-up screen select _businessKey (a key which is used to identify the record), and_memberCaption (this is simply a label to display when the item is used), and then click on theClose button.
TIP
- Year is a numeric data item and since we have declared it to be a memberCaption, we need to convert it into a character string.
- In the lower-right panel under Source, click on the ellipsis(…) button under the Source heading:
- In the Expression definition box, enter the expression CAST([Business view].[Time].[Year],CHAR(4)) and click on the OK button.
- Ensure that the Unique Level checkbox is checked as shown in the preceding screenshot.
- Right-click on the Year top label in the Hierarchies panel and rename the item to Time. Similarly rename Year(all) to Time.
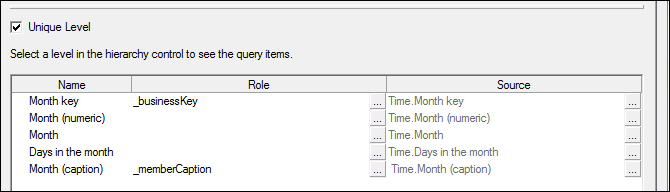
- Drag-and-drop the Quarter key label to the Hierarchies panel. Also drag-and-drop Quarter,Quarter (caption) and Quarter (numeric) to the lower right-panel. Make Quarter key into the_businessKey role, and Quarter (caption) into the _memberCaption role. Rename theQuarter key in the Hierarchies panel to Quarter, and mark the level as unique by checking theUnique level checkbox:
- Perform the same procedure for Month key:
- Select the Member Sort tab, check the Data checkbox, and select Always (OLAP compatible)for the sort options.
- Select each layer in turn and select Level Sort Properties: Year, Quarter key, and Month key.
- Click on OK and rename your new dimension to Time rather than the default name New Dimension.


Very Nice Post with very unique content.Keep maintaining like this.
ReplyDeleteThank you!.
cognos bi training
learn cognos online
cognos training online