Modeling Relational Data
After importing the metadata from your relational data source, you must ensure that it meets the reporting requirements of your users. This chapter will cover the modeling of the relationships between the data tables.
The topics covered in this chapter include:
- Dimension and fact tables
- Cardinality
- Determinants
- Role playing dimensions
- Loop joins
- Reflexive and recursive joins
By the end of this chapter, you will have modeled the relationships between the tables in an imported relational data source.
During the import process Framework Manager can automatically create the relationships between tables for you. In this situation it is important to review the created relationships to ensure that they give the correct results for use by the report authors.
Most modelers will choose not to allow the import process to create the relationships between tables. As a result, the modeler must create the relationships themselves.
In creating relationships, Framework Manager uses the data warehouse terminology of dimension tables and fact tables, because there is an inbuilt assumption that the modeler is modeling a data mart or data warehouse. This is not always true in all cases since most modelers will probably be modeling a transactional data processing system.
Two of the most important aspects of creating joins in Framework Manager are cardinality and determinants.
Cardinality
Framework manager uses the cardinality of the joins between tables to identify dimension and fact tables.
Cardinality affects how queries are written, and thus affects the results of the query. Framework Manager allows cardinality to be specified by the modeler or generated based on the criteria while importing from the database.
The general rules that apply to cardinality are as follows:
- Cardinality is applied in the context of a query, and only the cardinalities of items explicitly included in the query are evaluated
- Query subjects defined with one-to-many or zero-to-many cardinalities are always identified as facts
- Query subjects defined with one-to-one or zero-to-one cardinalities are always identified as dimensions
- It is possible to have a query subject that behaves as a dimension in one query and as a fact in another
A query subject that has only maximum (n) cardinality for all of its relationships to other query subjects can be regarded as a fact. This implies that there are always more rows of data in the fact query subject than in the related query subject on the minimum (1) side of the relationship.
A query subject having at least one relationship to another query subject with minimum cardinality (1) will be treated as a dimension.
Detecting cardinality during import
When importing the table definitions from a relational data source, cardinality can be detected based on a set of rules chosen by the modeler as part of the import process.
TIP
If you want to model all the relationships yourself, then ensure that all options are unchecked.
These rules are can be selected from the following:
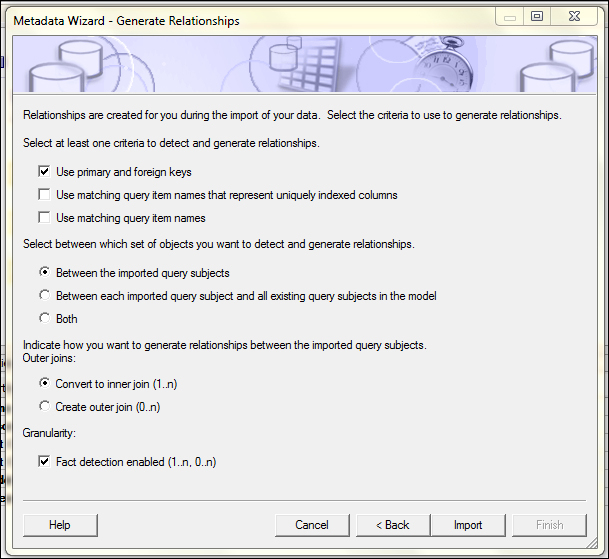
The default option for creating relationships during the import process is to select Use primary and foreign keys as these will already be defined in the data source.
Whichever options are used to import your metadata and generate relationships, it is important to remember that you are adding this information to your model.
If you do not want the import process to automatically detect the relationships between tables, then ensure that all options are unchecked before clicking on the Import button.
TIP
Never select the Use matching query item names option, unless you are sure that this is what you really want, as it can have unexpected results.
Creating relationships and cardinality
Most modelers will create relationships between tables themselves. Even after allowing Framework Manager to create the relationships automatically, business demands may require that the modeler creates additional relationships, and amends or removes the automatically generated relationships.
TIP
When creating relationships it is best to close the Tools pane, keeping the Project Viewerand Properties windows visible, and change the project pane to show the Diagram tab.
To manually create relationships between tables, perform the following steps:
- Expand the Project Viewer window until the tables you want to join are visible.
- Select the first table by clicking on it, and select the second table by pressing the Ctrl key before selecting the table – both the tables will appear in the Properties pane:
TIP
- Be consistent in selecting your tables, because whichever table appears on the left-hand side of the join is determined by the table selected first.
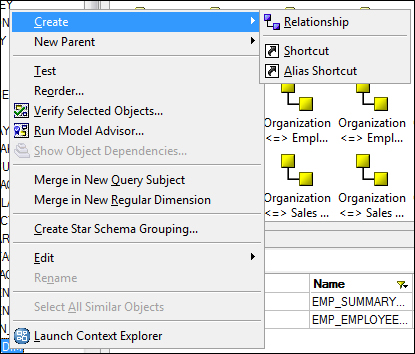
- Right-click on the table and select Create Relationship, or from the Actions menu, navigate toCreate | Relationship:
- Select the columns to be used to create the join between the tables – the selected columns will be highlighted and joined by a line:
- To add additional columns click on the New Link button, and select the columns to be joined.
- Set the cardinality on each end of the relationship join.
- Use the statement in the Relationship impact section to verify that you have correctly set the cardinality.
NOTE
- The usual join operator is =, but by clicking on the drop-down box next to the operator label, other operators such as >, <, <=, >=, and <> may be selected. More complex operators may also be selected by clicking on the ellipsis to the right of the statements in the Relationship impact section.
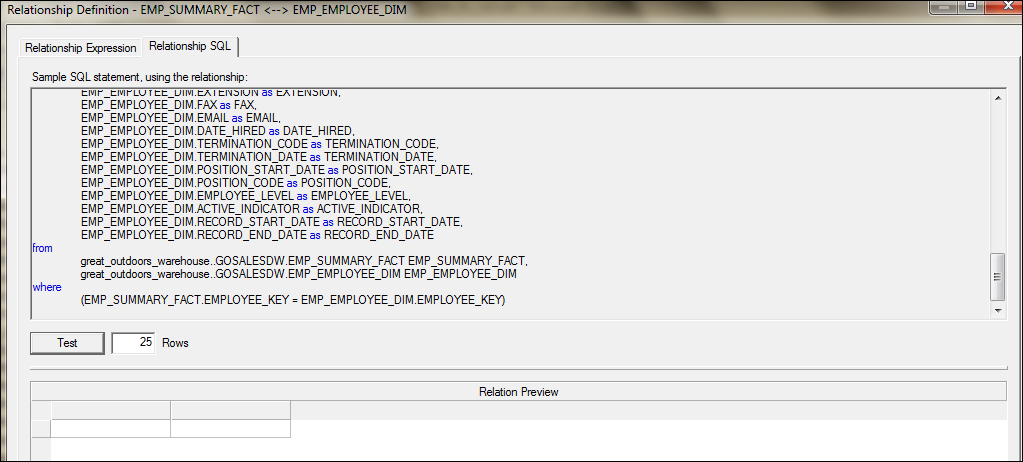
- Use the Relationship SQL tab to view the SQL that will be generated by the join just created between the two tables:
- The SQL may be tested by clicking on the Test button.
- When the defined relationship is correct, click the OK button to confirm the relationship between the selected tables.
TIP
- To verify or review all the relationships for any table, right-click on the table and select the Launch Context Explorer option.


No comments:
Post a Comment