Explore IBM Cognos Connection
This chapter focuses on IBM Cognos Connection, the IBM Cognos BI portal. If you are an end user, the topics in this chapter can be especially helpful to you to familiarize you with the IBM Cognos BI portal and how to use the links and objects displayed here.
After reading this chapter, you will be able to organize your content in IBM Cognos Connection, work with reports and external objects, use the search feature in IBM Cognos Connection, distribute and schedule your reports, customize IBM Cognos Connection, set up alerts, and watch rules.
Topics in this chapter discuss what it is and how to use the options available. This chapter is designed with the needs of different kinds of IBM Cognos BI users in mind. You can find that the topics are first covered at a high level, meeting the needs of the users who want to be familiar with only the functionality, however, will not personally use the software. There are others who are hands-on users who want to first become familiar with the interface and functionality and then start using it. For those users, each of the topics is elaborated later in the chapter. Also, if you are an advanced user and plan to use each of the options, keep reading, and you can find the steps elaborated and how to implement the same.
IBM COGNOS CONNECTION OVERVIEW
IBM Cognos Connection is the web portal for IBM Cognos Business Intelligence. It is the single point of entry that enables access to the enterprise data via any of the available IBM Cognos BI components such as Cognos Workspace, Cognos Workspace Advanced, Report Studio, and Query Studio.
In addition, IBM Cognos Connection enables you to create, run, maintain your reports, organize the contents in folders, pages, set security on contents, schedule your reports to run at certain times via the scheduling options, and set your user preferences, for example, content language, product language, and time zone.
IBM Cognos Connection is an easy-to-use portal. You can start using IBM Cognos BI immediately after the install. If required, you can also integrate it with your existing enterprise portal and enable single sign-on, allowing easy access to various business applications in your organization.
You may use IBM Cognos Connection out-of-the-box or customize it with your corporate colors, company logo, and icons as a part of your enterprisewide implementation of IBM Cognos BI.
You explore each of these options in detail in the upcoming sections in this chapter. Although all the options are discussed here, you might see all or fewer entries when you log in to your IBM Cognos BI environment. The entries that you see are guided by the security implemented in your IBM Cognos BI environment, by the Cognos BI administrator.
SECURITY IN IBM COGNOS CONNECTION: ROLES AND RESPONSIBILITIES
Out-of-the-box, your IBM Cognos BI environment is not secured; however, you can secure it to allow access to only those people who are authorized to do so.
In a secured IBM Cognos BI environment, you can control the options available in IBM Cognos Connection to the various functional roles in your organization. IBM Cognos BI architecture enables you to expose only those links in IBM Cognos Connection that are relevant or applicable to a particular role or responsibility when using an IBM Cognos BI application. For example, a business analyst or departmental head does not need to see options available in IBM Cognos Connection required for administration and maintenance of an IBM Cognos BI application. In this case it may suffice to expose only the reports, analyses, or queries that they require to run.
At a high level you should understand that the tasks that you can perform in IBM Cognos Connection depend upon the Cognos role you have been assigned to. Cognos roles represent groups of people who either have similar functional responsibilities or have similar status in the organization, for example, HR managers, business analysts, and others.
Some predefined Cognos roles are available out-of-the-box that can be leveraged as-is or modified to suit your organizations’ security needs. For example, users belonging to the Consumers role can run and view reports; users in the Authors role can create reports, and so on. You can also create new Cognos roles that reflect your organization’s security requirements. For example, you can create a new Cognos role—HR managers, for users who require access to HR reports designed for HR managers.
If you are an end user who needs to run and view reports, you may belong to the Cognos role:Consumers. You should note that, by default, members of the Consumers role cannot administer thePublic Folders content. Members of Consumers role can run and view reports; and although they cannot save a report in the Public Folders, they can save it in their My Folders. Members belonging to the Authors role will have the ability to save reports to both Public Folders and My Folders.
The users are assigned to a Cognos role by the IBM Cognos BI administrator.
For more information on IBM Cognos BI Security, refer to Chapter 12, “Securing IBM Cognos BI Environment and Its Objects.”
COGNOS REPORTS
Cognos reports are typically available to you via IBM Cognos Connection. Report in Cognos refers to a report output or the report specification, that is, the code that tells the Cognos server about the information to be included in the report such as the data, format, and page breaks.
The report developer creates the report specification and saves the report. This saves the report specification into the IBM Cognos Content Store database. The saved report specification includes all the information pertaining to the report, for example, the report layout, columns in the report, prompts, and so on.
The end user can run these saved reports (specifications) to retrieve data from the underlying data source(s). You can also choose to view the output of previously run reports.
Note that depending on the Cognos component used to build the report, it may alternatively be referred to as a report in Report Studio, a query in Query Studio, an analysis in Analysis Studio, or an event in Event Studio.
Report authors use metadata package to build the report. The type of package may vary depending on the Cognos component used to build the report; however, all reports are typically created using a package.
Working with Cognos Reports
The options available to you when working with a Cognos report can vary depending upon the Cognos component used to build the report, that is, the options available to you for Report Studio report andAnalysis Studio analysis will be different. This section highlights the different options available to you when working with the reports; detailed how-to’s are covered later in relevant sections in the chapter.
Run Reports
You can run the report by clicking the Run icon beside the report. The report output displays in theIBM Cognos Viewer in the format you requested, for example, HTML, PDF, and more. The report presents the current data from the data source. HTML is the default output type.
View Reports
When you click the report, you may notice that the report output displayed is from the previous run and opens in IBM Cognos viewer. This is because the Default Action property of the report is set to “View most recent report.” You can tell if you are looking at the saved version of the report if the icon with the report name does not have the run icon (blue triangle on the left of the report name) or if you see an icon resembling stacked pages in the Actions column.
Distribute Reports
You can distribute reports from the Run with options > Advanced options link available to you in the Actions column in Cognos Connection. This enables you to specify options to print the report oremail to others. You can distribute the reports by printing a hard copy or saving it in a shared location. You can distribute a report in multiple languages.
Schedule Reports
You can schedule reports to run at a later time or a specified frequency, for example, every Friday at 5:00 p.m.
Number of Rows per Web Page
You can change the number of rows the report displays on a web page. When the report has more rows than the number specified for this property—that is. the number of rows per web page—you have the options Top, Page up, Page down, and Bottom links at the bottom of the page. If you increase the number of rows to, for example, 100, that is more than what your screen can fit, and you see scrollbar on the right side of the screen. The default is 20 rows per page unless modified by the report developer.
View Report Output Versions
You can use the view report output version via the More... link in the Actions column or by clicking the stacked pages icon under the Actions column in the report. This option enables you to view historical data from your previous report runs. When you run the report, an output version of the report is created. The number of versions you can have depends upon the Report Output Versionsproperty setting of the report. You can view the report output from previous dates by selecting the date from the list. The Manage versions... link enables you to view all the output dates and delete the outputs you do not need. By default, the list contains report outputs for the language defined in the Content locale.
View Run History
You can view the run history via the More... option in the Actions column for the entry. The View run history option enables you to see the reports you ran and the statuses, that is, if it ran successfully or is still executing. The run history of the report is created when you save the report or run it in the background. This option provides the status of the entry as Canceled, Executing, Failed,Pending, Succeeded, Suspended, or All statuses. You can also view from here the Request time, Start time, Completion time and Status. It enables you to view any errors or warning that were generated during the run via the View run history details icon in the Actions column, in the View run history window. Similar to View Report Output Versions, the stacked pages icon under the Actions column enables you to view the report outputs. You can control how many occurrences or how long you want to keep the history from Set Properties of the entry.
IBM COGNOS CONNECTION USER INTERFACE
IBM Cognos BI supports both authenticated and anonymous access to its users. In a secured IBM Cognos environment, you are required to provide your credentials, user ID, and password to successfully log on. Anonymous access does not require a user ID and password to access the IBM Cognos BI content. Anonymous access is commonly used to expose IBM Cognos BI Content to the public, such as general company information.
When you log on to IBM Cognos BI, the IBM Cognos Welcome page displays, as shown in Figure 3.1. You can click appropriate option and proceed. Uncheck the Show this page in the future option to skip the welcome page in the future, as shown as option 15 in Figure 3.1. Clicking Quick Tour option, as shown as16 in Figure 3.1 enables you to get a quick tour of IBM Cognos Connection, IBM Cognos Query Studio, IBM Cognos Report Studio, IBM Cognos Analysis Studio, and IBM Cognos Event Studio in versions prior to Cognos 10.2.
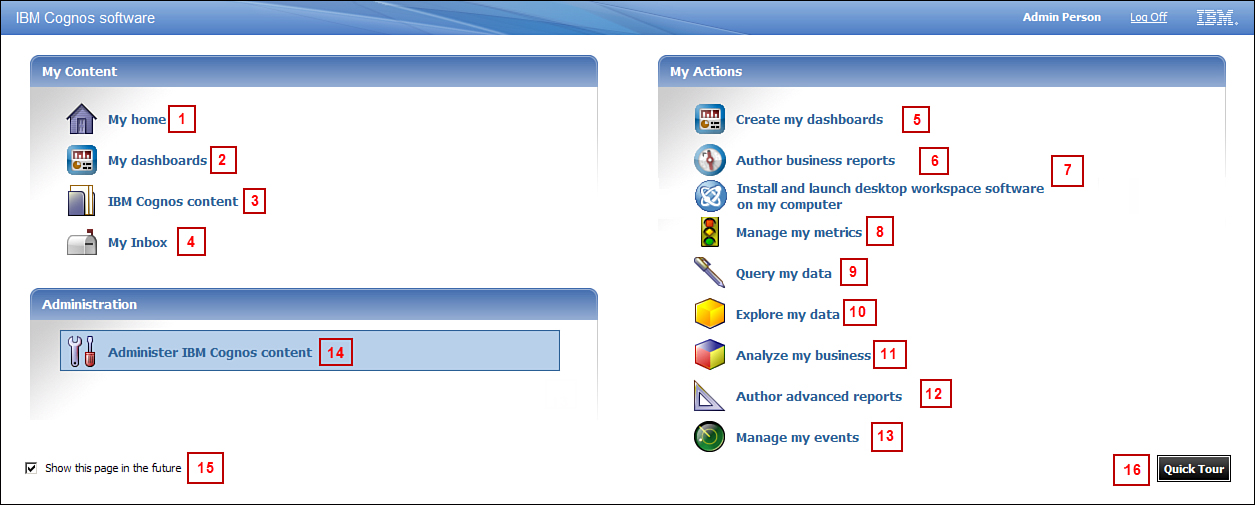
Figure 3.1. IBM Cognos Welcome page.
The options available to you on your Welcome screen depend upon your access permissions in the IBM Cognos BI environment, for example, the Administration option shows here only if you are an IBM Cognos BI administrator.
There are three sections on this screen My Content, My Actions, and Administration, which enable you to quickly access the component you want to work with, as demonstrated in Figure 3.1. After you are in IBM Cognos Connection, you can also launch various Cognos components via theLaunch option, discussed later in this chapter.
To work with your existing IBM Cognos BI content, click IBM Cognos content, as shown as option 3 in Figure 3.1, which brings you to IBM Cognos Connection. As mentioned earlier all your reports, queries, workspaces, packages, and so on are available to you in IBM Cognos Connection. To work with a Studio or another Cognos component, you can click the appropriate link in the My Actions section and launch the Cognos component. For Cognos BI administration, click the Administer IBM Cognos content link in the Administration section, as shown as option 14 in Figure 3.1.
My Content options enable you to quickly access your Cognos content, that is, reports, workspaces, queries, and more.
1. My home takes you to the page you have marked as your home page.
2. The My workspaces option enables you to create a new Cognos Workspace.
3. The IBM Cognos content option takes you to IBM Cognos Connection from where you can access your reports, workspaces, metrics, news items, and other Cognos content.
4. My Inbox enables you to view and manage your tasks and notifications.
My Actions options enable you to launch the Component listed here and start creating your Cognos content.
5. Create my workspaces enables you to quickly assemble your content into interactive and personalized workspaces using Cognos Workspace.
6. The Author business reports option enables you to create business reports using Cognos Workspace Advanced.
7. The Install and launch desktop workspace software on my computer option enables you to install Cognos Insight on your desktop. After the software is installed on your computer, you can use it to explore data from flat files such as Excel, delimited text files, and so on. This is not a Cognos core component and will not display by default after Cognos BI install.
8. The Manage my metrics option enables you to monitor your performance metrics against targets using scorecards in Metric Studio. This option is available only if you have Metric Studio installed in your IBM Cognos BI environment.
9. Query my data enables you to create queries using Query Studio.
10. The Explore my data option enables you to explore your data using PowerPlay Studio. This option is only available if you have PowerPlay Studio installed in your IBM Cognos BI environment.
11. The Analyze my business option enables you to analyze your data using Analysis Studio.
12. The Author advanced reports option enables you to create complex and advanced reports usingReport Studio.
13. The Manage my events option enables you to detect and track business events using Event Studio.
14. The Administer IBM Cognos content option enables you to administer IBM Cognos BI content, for example, schedule reports, secure the environment, deploy reports, manage and maintain performance metrics, and so on.
Explore IBM Cognos Connection
IBM Cognos Connection is the Cognos web portal and is the single point of entry that enables you access to your enterprise data, as shown as option 1 in Figure 3.2, and it hosts all the Cognos content. What you see in IBM Cognos Connection can differ based on your permissions in the IBM Cognos BI environment.
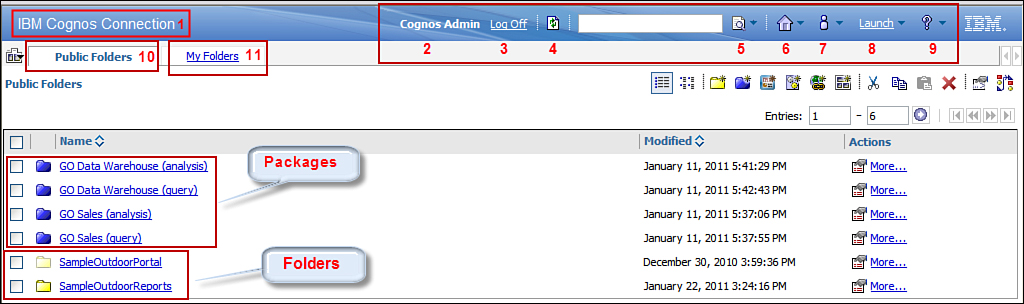
Figure 3.2. IBM Cognos Connection.
IBM Cognos Connection is the portal that hosts all IBM Cognos content, that is, reports, queries, agents, analyses, scorecards, packages, and more.
You can save these entries in either Public Folders or My Folders.
User Information
In a secured IBM Cognos BI environment, the username of the user currently logged on displays in IBM Cognos Connection, for example, Cognos Admin, as shown as option 2 in Figure 3.2.
Log On or Log Off
In a secured IBM Cognos BI environment, after you log on, you can use the Log Off link to log off from the IBM Cognos BI environment, as shown as option 3 in Figure 3.2. When you log off, your IBM Cognos BI session ends. If you were logged on to multiple namespaces, you will be logged off from all the namespaces. Closing the browser has the same effect and ends your IBM Cognos BI session.
If your IBM Cognos BI environment enables anonymous (guest) access, you can access the content that is exposed in IBM Cognos Connection without logging in. You can see a Log On link, which you can use to log on to IBM Cognos BI with valid credentials.
Refresh Options
You can also refresh the page by clicking the Refresh link in IBM Cognos Connection, shown as option 4 in Figure 3.2.
Search
Search enables you to search on IBM Cognos BI Content, shown as option 5 in Figure 3.2. Search options are covered in detail in the later section “Search, Home, My Area Options, and Launch Options Explained.”
Home
The Home option enables you to quickly navigate to the page that you identify as your home page, shown as option 6 in Figure 3.2. Home options are covered in detail in the section “Search, Home, My Area Options, and Launch Options Explained,” later in this chapter.
My Area Options
From the My Area Options you can access four functionalities: My Inbox, My Watch Items, My Preferences, and My Activities and Schedules, shown as option 7 in Figure 3.2. Each of these is covered in detail in section “Search, Home, My Area Options, and Launch Options Explained,” later in this chapter.
Launch
From here, you can launch the IBM Cognos Components, for example, Cognos Workspace, Cognos Workspace Advanced, Query Studio, and so on as shown as option 8 in Figure 3.2. Launch is covered in detail in the section “Search, Home, My Area Options, and Launch Options Explained,” later in this chapter.
Help
The question mark sign is for help, as shown as option 9 in Figure 3.2. From here you can get help on various topics in IBM Cognos BI. The Help link provides step-by-step procedures and background to use the IBM Cognos software; the Getting Started link provides examples on various key topics, theMore Documentation link provides additional product documentation, IBM Cognos on the Webtakes you to the IBM Cognos website, Go to the Welcome Page takes you to the Cognos Welcome page directly from wherever you are in the Cognos BI environment, and lastly About IBM Cognos Connection takes you to the screen that provides information on the version of IBM Cognos BI you are using.
Public Folders
Public Folders, as the name suggests, has content accessible or shared by other users. By default when you log on you land in the Public Folders, as shown as option 10 in Figure 3.2. Public Folder is a shared location, and objects in this area are accessible by everyone, unless otherwise secured. The IBM Cognos BI content, for example, reports, queries, folders, packages, and scorecards, are stored here. Examine the published packages in Figure 3.2. These packages contain metadata information that report developers and business users use to build their reports, queries, and more. Also, folders were created to organize the content in Cognos Connection.
If you are a report Consumer, you cannot write to the Public Folders; however, you can in your My Folders.
My Folders
Content stored in My Folders is available to you only and cannot be seen by others. If you want to share your report with others, you must save it in the Public Folders or a shared location defined by your IBM Cognos BI administrator. When you first log on, My Folders will be empty. You can create folders and subfolders here to organize your IBM Cognos BI content. My Folders is shown as option 11 in Figure 3.2.
Search, Home, My Area Options, and Launch Options Explained
The following section covers in detail some of the options already introduced to you while exploring Cognos Connection. Only those options that provide multiple choices are covered here, each of the choices is explained in detail.
Search
You saw earlier that the Search option is available to you in Cognos Connection, as shown in Figure 3.3. Use this option to perform search on the IBM Cognos BI content. The Search option searches through only those entries that you have permissions to access. Search is not case-sensitive.

Figure 3.3. Search Options in IBM Cognos Connection.
You can change your choice to any of the available options to specify your search context. The Name field is the name of the object, and the Description field is an optional description that can be defined for an entry.
You can perform the search on Full text and all fields (default), Name field, Description Field, Name or description field, as shown in Figure 3.3.
When you search for an item you notice that with the search output, the Advanced option becomes available to you. You can use this to perform an advanced search, as shown in Figure 3.4.
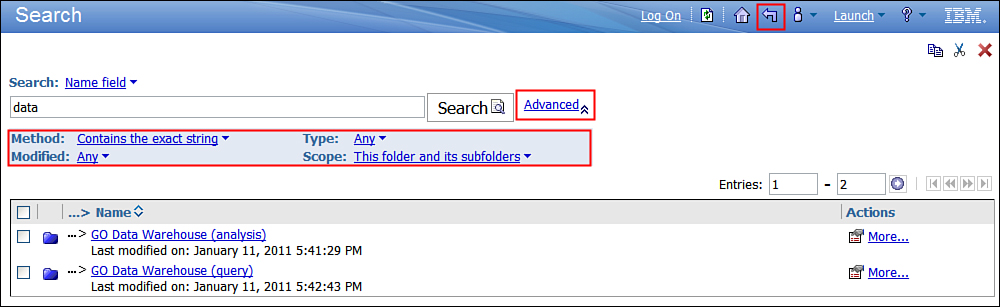
Figure 3.4. Advanced search options.
Advanced search has the following options you can use to further refine your search criteria:
• Method: This enables you to choose one of the three types of search you can perform:
• Contains exact string: Use this option to search for a string that is anywhere in the name or description.
• Starts with the exact string: Use this option to find a name or description that starts with your search string.
• Matches the exact string: Use this option to find a name or description that exactly matches your search string.
• Type: Use this option to specify the type of object you are searching to narrow your search criteria for example, Any (default value), Report, Shortcut, Agents, URL, and package.
• Modified: This option enables you to define the timeframe for your search, for example, Any(default), Today, In last 3 days, In last week, In last month, In last 3 months, In last 6 months, In last 12 months, and In last 36 months.
• Scope: This option enables you to define the scope of your search, that is, the location of that object. You can choose from This Folder and Its Subfolders (default), This Folder Only, My Folders and Public Folders.
You can return to the previous screen by clicking the Return icon on top right of the screen, as shown inFigure 3.4.
Home
If you want to set the page that you most frequently use as your home page, you can use the option Set View as Home when you are on that page. IBM Cognos BI makes that page the one that you first see when you log on. Also, when working on other pages within IBM Cognos BI, clicking the Home link takes you directly to the page that you set as your home page, as shown in Figure 3.5. To make a page your home page, first navigate to that page, then click the Home icon, and choose Set View as Home.

Figure 3.5. Set your home page.
My Area Options
My Area Options in IBM Cognos Connection gives you access to your Inbox, watch items, preferences, and activities and schedules, as shown in Figure 3.6.

Figure 3.6. My Area Options in IBM Cognos Connection.
You can explore these options now and further discuss each one in detail later in this chapter.
My Inbox
My Inbox is your inbox in the IBM Cognos BI environment. It enables you to work with notifications and take action without leaving your Cognos BI environment. The watch rules, notifications, and approvals go into your Inbox.
My Watch Items
You can use My Watch Items to monitor and manage critical business events/information from one location. Use My Watch Items to manage and view alerts for new report versions and rules for conditional report delivery.
My Preferences
You can use My Preferences to change the look and feel of IBM Cognos Connection and personalize it, for example, time zone settings, language for Cognos Connection content, and how the items display in IBM Cognos Connection. The changes you make here take effect immediately in the current session and are saved for future sessions until you change them again; these changes do not impact other users.
My Activities and Schedule
The My Activities and Schedule option enables you to manage your activities in IBM Cognos Connection. From here you can view the past, current, upcoming activities, and scheduled activities, both in list and bar chart view. In an unsecured environment or if you are an administrator, you can set run priority for your activities per your needs as well as view the run history. This option shows up only for you if you have access to the Scheduling capability.
Launch
The Launch option enables you to launch the various studios and components available in your IBM Cognos BI environment, as shown in Figure 3.7. You must have been granted access to these components for them to show in the list. This is controlled by the IBM Cognos BI administrator depending upon your role and responsibilities in the IBM Cognos BI environment.
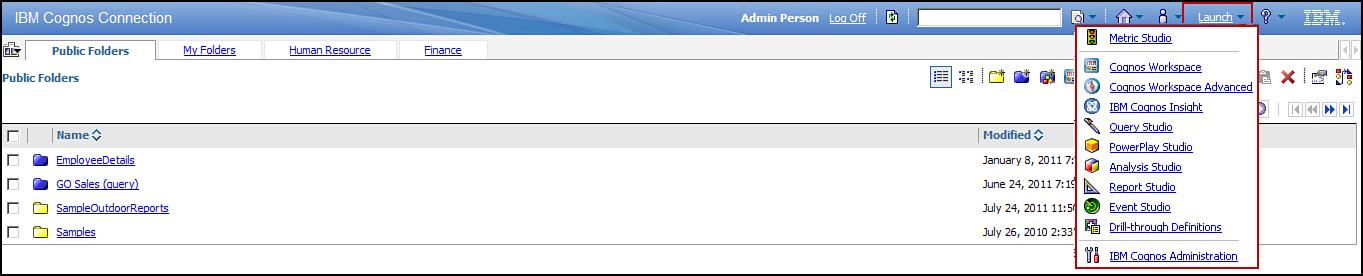
Figure 3.7. Cognos Connection options in the Launch menu.
For the IBM Cognos BI administrator, the administration options would also be available in the list, for example, Drill-through Definitions and IBM Cognos Administration options. For details on each of the components, refer to Chapter 2, “IBM Cognos 10 BI Architecture and Components.” Click the link that refers to the component you want to work with.
Toolbar Options, Actions, and Objects
Toolbar options provide you with choices to manage and maintain entries in IBM Cognos Connection. The options are explained in the same numbered sequence, as shown in Figure 3.8.

Figure 3.8. Cognos Connection – Toolbar Options, Actions, and Objects.
1. List view: This is the default view of entries in IBM Cognos Connection. It shows the name, modified date, and actions that can be performed on each entry. In Figure 3.8 the entries display in list view.
2. Details view: Provides additional information on each entry in IBM Cognos Connection. It displays name, description, and screen tip of 100 characters in length (if you set it up). The screen tip appears when you hover your mouse pointer on the icon for the entry in the portal.
3. New Folder: Enables you to create a new folder so that you can organize your entries. You can create subfolders within folders just like in Windows Explorer. Depending on your access permissions, you may or may not create folders in Public Folders; however, everyone can create them in their My Folders.
4. New Package: Creates packages for SAP BW and PowerCube data sources from within IBM Cognos Connection.
5. New Metric Package: Shows only if you have installed Metric Studio. Use this option to create a new Metric Package. Clicking this link brings up the New Metric Package Wizard; you must provide a name, description, screen tip, and location, specify a data source for metric store, and initialize it.
6. New Workspace: Launches Cognos Workspace to create your workspaces. After you are in Cognos Workspace, you can drag and drop items to build your workspace.
7. New Job: You can create jobs to run multiple tasks together or in sequence. You can either run these jobs manually or schedule them to be run at a certain time. For example, you can run all your monthly reports at once or at a certain time and send them to your users. You can also choose to send reports to mobile recipients.
8. New Data Integration Task: Shows only if you have Metric Studio installed. It enables you to create a new data integration task that you can use for new metric import from files.
9. New URL: Enables you to save the URLs for frequently used web sites and external files. When you click the URL, it opens the web site or the file. You can return to the Cognos portal by clicking the back arrow. Before you can use the URL, the server that hosts the web site or the file must be included in the valid domain list in the IBM Cognos Configuration tool by your Cognos BI administrator. When you click the New URL icon, you can see the domain names that you can use in the URL by clicking theView Acceptable Domains link.
10. New Page: Pages enable you to group information together and display it in one location. You can create a page in Public Folders or My Folders. You can create a shared page in Public Folders and secure it appropriately for the groups that require access to it.
11. Cut: Cuts an entry from its existing location in Cognos Connection.
12. Copy: Makes a copy of an existing entry in Cognos Connection.
13. Paste: Pastes an entry in any location in Cognos Connection that you copied using the Copy option.
14. Delete: Removes an entry from Cognos Connection.
15. Set Properties: Public Folders: Sets permissions and grants access on capabilities and objects in the Public Folders. This option is available for the objects that you create or exist in Cognos Connection. You can use the Set Properties option to define property of the entries as required by your Cognos BI implementation.
16. Order: Changes the display order of entries in the Public Folders. By default the entries are sorted in ascending order; however, if you require certain files or folders that are of importance to you to show first, you can order them in the way you require.
17. Tab Menu: Adds new tabs, removes an existing tab, or modifies the sequence in which they appear in Cognos Connection. The options available are Add tabs, Remove this tab, and Modify the sequence of tabs.
18. Finance tab: Created by a user using the Add tabs Option from the Tab Menu, as stated in step 17. This example illustrates that users can create tabs to organize their content. This tab was created to hold all Finance department reports. You can create folders and subfolders here to further organize your content.
19. Human Resource tab: Like the Finance tab, this tab was also added by the user to illustrate that users can create tabs as required by the business. You can further secure the tabs to be visible to certain groups of people. In this example you can secure the Human Resource tab so that it is accessible to people in the Human Resource department only.
20. Name: Every entry in Cognos Connection must have a name.
21. Modified: The date and time when the entry was last modified. The date/time is the date/time on the server where Cognos software is installed.
22. Actions: Lists the associated actions that can be performed on the entry. Depending upon the entry type, the available icons vary.
23. 2010: Folder that was created to organize 2010 reports. Examine the options in the Actionscolumn.
24. Saved HTML Report: Examine the icon for the report. This icon indicates that when you click the link it can open the saved version of the report. Examine the options in the Actions column.
25. Report view: Examine the icon associated with this entry. It indicates that this is a report view to an existing report. It is discussed in detail in the section “Create Report View,” later in this chapter. Examine the blue triangle in the icon, which indicates that the report will run when you click on the link. Also examine the options available in the Actions column.
26. HTML Report: Examine the icon associated with this entry. When you click the link, the report runs and gives you the output in HTML format in Cognos Viewer. Examine the options available under the Actions column.
27. Set Properties: Available with every object in Cognos Connection. You can set the property of each entry you create to control its behavior. You may modify the properties of other entries depending upon your security permissions in the Cognos BI environment. This is covered in detail in the section, “Examine Options in the Actions Column.”
28. View the output versions of this report: This option is shown as stacked pages indicating that saved output versions of this report are available. This is covered in detail in the section “Examine Options in the Actions Column.”
29. Run with options: Enables you to specify the format, language, delivery, and more for the report when it is run. This option is covered in detail in section, “Examine Options in the Actions Column.”
30. Open with Report Studio: Enables you to open the entry in Report Studio.
NOTE: This icon can vary depending upon the tool that was used to create the entry, for example, Report Studio. For entries created using Query Studio, Analysis Studio, Metric Studio, PowerPlay Studio, or Event Studio, a corresponding icon displays. In addition, you see this icon only if you have been granted permission to use the Studio that was used to create the entry.
31. Create a report view of this report: Enables you to create a report view of the report. When creating a report view of the report, you must provide a name and location where the report view should be created; other options are optional. Report views are handy when you want to use the same report in another language or schedule it at another time than the original report. It is covered in detail in the section, “Examine Options in the Actions Column.”
32. Schedule: Use this option to schedule the entry to run at a later date/time. This option is discussed in detail in the section, “Examine Options in the Actions Column.”
33. More...: This shows all options available for an entry, including additional functionality such asMove, Copy, View my permissions, Create a shortcut, and so on (including those listed in the Actions column). This is covered in further detail in the section “Examine Options in the Actions Column.”
GETTING READY
This section familiarizes you with Cognos Connection and guides you to create objects that are used in the examples throughout the chapter. You can follow along with the examples and create these objects in your own Cognos BI environment. To create the objects you must have relevant privileges. During the exercise if you do not have privileges to create new objects and have Cognos Samples installed, you can reuse the Cognos sample objects or replace the folder name with any folder that exists in your environment and the report name with any report that exists in your environment,. The goal is to navigate and work with objects in Cognos Connection. You must have some Cognos Content to work with; although, it does not have to be the same report.
Perform the following steps to create the objects used in the examples throughout the chapter.
1. Click the Public Folders tab to navigate to Public Folders (if not already there) > click the New Folder icon on the toolbar (shown as option 3 in Figure 3.8).
NOTE: By default the new folder will be created in the location where you are when you click the New Folder icon. Ensure you navigate to the correct location first, for example, Public Folders.
2. In the Name field, enter SampleOutdoorReports, if you have the privilege to create in Public Folders (and it won’t make your BI administrator unhappy); click Finish.
NOTE: If you do not have the privilege in Public Folders, create it in your My Folders, just use this location each time there is a reference to the folder in Public Folders.
3. Repeat steps 1–2 to create the following folders: SampleOutdoorDashboard andSampleOutdoorJobs.
4. Click the check box for the SampleOutdoorJobs folder to select it > click the Copy icon (shown as option 12 in Figure 3.8) > navigate to My Folders by clicking My Folders tab > click the Pasteicon (shown as option 13 in Figure 3.8).
NOTE: Although you can create a SampleOutdoorPortal folder as indicated in steps 1–2, steps 4–6 give you an opportunity to practice other options available in the portal.
5. In My Folders tab > locate the SampleOutdoorJobs folder > in the Actions column forSampleOutdoorJobs, click Set Properties (shown as option 27 in Figure 3.8) > in the Name field > type SampleOutdoorPortal by overwriting the existing value > click OK.
NOTE: You reused an entry by using the copy and paste option and then renaming the entry.
6. In My Folders > select the check box for SampleOutdoorPortal folder > click Cut (option 11 inFigure 3.8) > navigate to Public Folders > click Paste (option 13 in Figure 3.8).
7. Copy any existing report and paste it in the SampleOutdoorReports folder; rename it toRevenue by Product.
8. Repeat step 7; rename the copied report to Product Forecast.
EXAMINE OPTIONS IN THE ACTIONS COLUMN
You now examine the options available in the Actions column in detail. Refer to option 22 in Figure 3.8.
Set Properties
Set Properties is shown as option 27 in Figure 3.8. From the Set Properties window, you can control the appearance and behavior of an entry. In the figure, clicking the Set Properties icon (option 15) forPublic Folders enables you to change the properties of the Public Folders.
The properties for an entry depend upon the type of entry. For example, the properties for reports can vary from the properties of a folder or portal tab. Properties that are not applicable for the selected entry do not show up in this window.
Refer to Figure 3.9 to see the Set Properties for the Employee Training report. There are three tabs:General, Report, and Permissions. The middle tab varies depending on the entry type, for example, for a Report this middle tab shows Report, for a Report view the middle tab shows Report View. In addition, the options available in this tab also vary depending on the type of entry.
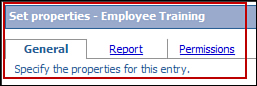
Figure 3.9. Set Properties options.
General Tab Options
The General tab provides general information about the entry, for example, type, owner, contact, and so on, as shown in Figure 3.10.
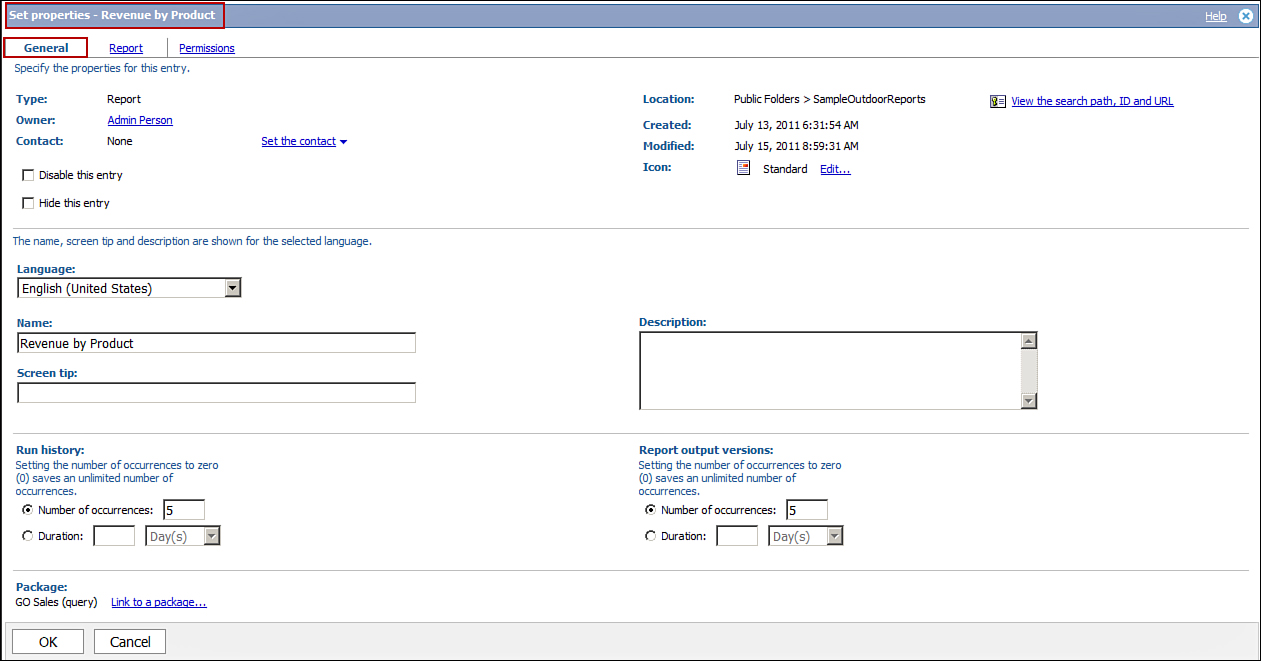
Figure 3.10. Set Properties General tab options.
Options available on the General tab for a Report are as follows:
• Type: Refers to the type of entry, if it is a report, shortcut, and so on.
• Owner: Refers to who owns the report. By default the person who creates the entry is the owner of the entry. A person with the appropriate privilege can change the owner of the report.
• Contact: Provides the contact information regarding this entry. You can set the contact information either by picking from the authentication provider or by typing in a valid email address.
• Location: Refers to the path of the report in Cognos Connection. The link View the search path, ID and URL is useful information for the developers because they can use this information to build URLs to the object.
• Created: Refers to the date and time the entry was created. (The date/time is from the Cognos server.)
• Modified: Refers to date/time (on Cognos server) when the entry was last modified.
• Icon: Shows the icon used to indicate this entry in Cognos Connection. Using the Edit: link you can specify another icon.
• Disable this entry: Restricts user access to the entry and its associated entries, such as shortcuts, and more. This is a useful feature to use during an application maintenance period. When you disable the entry, users cannot work with the entry and its associated objects. If you disable a parent entry, the child entries are automatically disabled, for example, disabling a folder also restricts access to subfolders and other contents in it. You should check this box to disable the entry.
• Hide this entry: Useful to hide objects that exist to support other functionalities in the Cognos application; however, it is not required directly by the users, for example, drill-through reports from Cognos Connection. Hiding an entry does not impact the property settings or security settings of the entry. You can view hidden entries via My Preferences > Show hidden entries check box. You can hide/unhide entries only if you have permission on Hide Entries capability in IBM Cognos Connection.
• Language: Enables you to change the report language, that is, the data and report header language only, provided the metadata supports multilingual data. The Cognos Viewer and Cognos Connection options still show in the default language, for example, English.
• Name: Enables you to provide an appropriate name for the entry that your users can easily understand or that reflects the business.
• Screen Tip: Provide a brief description of the entry that users can see when they hover the mouse pointer on the entry in Cognos Connection.
• Description: Provide a brief description on the purpose of the report, its usage, or anything that is meaningful to you.
• Run History: IBM Cognos software tracks information on each run of the entry, for example, request time, start time, and completion time, and if the report ran successfully. From here you can define how long you want to keep the run history for the entry. You can either specify Number of occurrences as the last n runs of the report, that is, the last five runs (occurrences) of the report or specify the Duration as days or months, for example, 5 days or 1 month. To keep all the run histories, you can set the Number of occurrences to 0, which enables you to keep an unlimited number of occurrences. All this information is stored in the Content Store; you must carefully make your decisions.
• Report Output Versions: Every time the report is run, the report output version is stored in the Content Store database. When you run the report, it retrieves the latest data from the underlying data source. If you need to compare the report data from each run, you can specify how many occurrences of the report output versions you need to store via Number of occurrences, or you can specify theDuration in days or months. To store unlimited report output versions, you can set Number of occurrences to 0. You must carefully make this decision, guided by the number of users and available space/size of the Content Store. The default is 1.
• Package: Shows the package that is currently used by the report. The Link to a package link provides a list of packages available to you. Clicking this link enables you to link the report to a package from an available list of packages.
Report Tab Options
As mentioned earlier the middle tab of the Set Properties screen depends on the type of entry selected. Figure 3.11 demonstrates the entry is a Report because the middle tab shows the type of object; for example, Folders for folders, Report for Report Studio report, and more. On this tab you can define the default action to be performed when you click the report name and the report format as HTML, PDF, and so on.
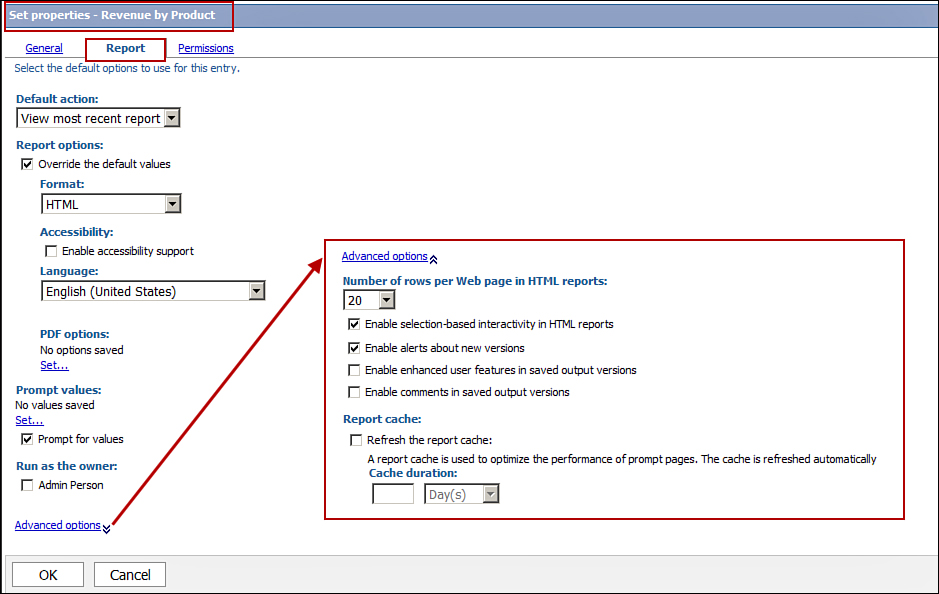
Figure 3.11. Set Properties Report tab options.
• Default actions: You can specify the default action for the entry, that is, what should happen when you click the report link in Cognos Connection. The options available for a report are View most recent report, Run the report, and Open with Report Studio. The default for a report is View the most recent run of the report; however, you can change it to the one applicable to you.
• Report Options:
• Override the default values check box: Specify the following report options: Format, Accessibility, Language, and PDF options. You can change any of the Report options setting by checking the Override the default values check box.
• Format: Specify the report output format as HTML (default), PDF, Excel 2007, Excel 2002, Delimited text (CSV), or XML.
• Accessibility: Enables you to use Accessible report output for users with special needs (disabilities). Enabling this feature allows them to access report content using assistive technologies such as screen readers. You can create accessible output for reports and jobs and scheduled entries in PDF, HTML, and Excel 2007 format.
• Language: You can specify the language for your report content; that is, the data in the report and the report headers appear in the language you choose here.
• PDF Options: Using this option you can specify for PDF outputs specifications. Click on the Set link to set additional options listed here:
• Orientation: Portrait, Landscape and Default.
• Paper Size: Letter, Legal, 11x17, A3, A4, B4 JIS, B5 JIS, and Default.
• Access Control:
Requires a password to open the report check box: Enables you to password protect your PDF report file output.
Requires a password to access options check box: Enables you to password protect working with a PDF file.
Allow Printing: Provides you options for Low-Level Representation, High-Level Representation, and None (default).
Allow Changes: Provides you the following options as check boxes: Modify the Document’s Content, Add or Modify Text Annotations, Fill in the Forms and Sign the Document, Assemble the Document (Insert, Delete, or Rotate Pages and Create Navigation Elements). Check the boxes applicable to you.
Allow Content Extraction: Provides you the following options as check boxes, Extract text for screen reader devices (default), Copy of text, images, and other content. Check the boxes applicable to you.
• Prompt values: This option is applicable for reports with prompts. If you check Prompt valuesand the report contains prompts, you will be prompted to provide values for the report prompts when the report is run. In addition, you can define the values for prompts here and clear the check box to allow users to run the report without being prompted for a value. This is especially helpful when you want to run a report (or a report view) with prompts via a job or schedule it to run later without user interaction.
• Run as the Owner: This option enables you to use the capabilities of the owner when bursting the reports.
• Advanced Options: You can define advanced options for your report, that is, the number of rows per web page, if the report has the capability to set alerts for new versions, and so on. Each of the advanced options is explained in the following bullets:
• Number of rows per Web Page in HTML reports: You can change the number of rows that display on a web page. When the report has more rows than the number specified, you have these options: Top, Page Up, Page Down, and Bottom Links at the bottom of the page. For example, if you increase the number of rows to 100 rows, you can see a scrollbar on the right side of the screen.
• Enable selection-based interactivity in HTML reports: Enables you to drill up, drill down, drill through, use IBM Cognos Search, set watch rules, and set notification when the report is viewed in the Cognos Viewer. See the section, “My Watch Items,” for further details on setting alerts.
• Enable alerts about new versions: If you enable this option using the check box you will be alerted when a new version of the report is stored in the Content Store.
• Enable enhanced user features in saved output versions: You must enable this option if you are evaluating watch rules in saved HTML report output.
• Enable comments in saved output versions: Enabling this option via the check box allows the users to add comments to saved reports using the Cognos Viewer. You can add comments to HTML, PDF, and XML outputs only.
• Report Cache: Refresh the Report Cache: Optimizes the performance of prompt pages.
Permissions Tab Options
The Permissions tab shows the permissions assigned on the entry. Also, the permissions tab will be visible to you only when you have required privileges defined on the entry. If you have appropriate privileges you can add or remove users, groups, or roles that have access to this entry, as shown inFigure 3.12.
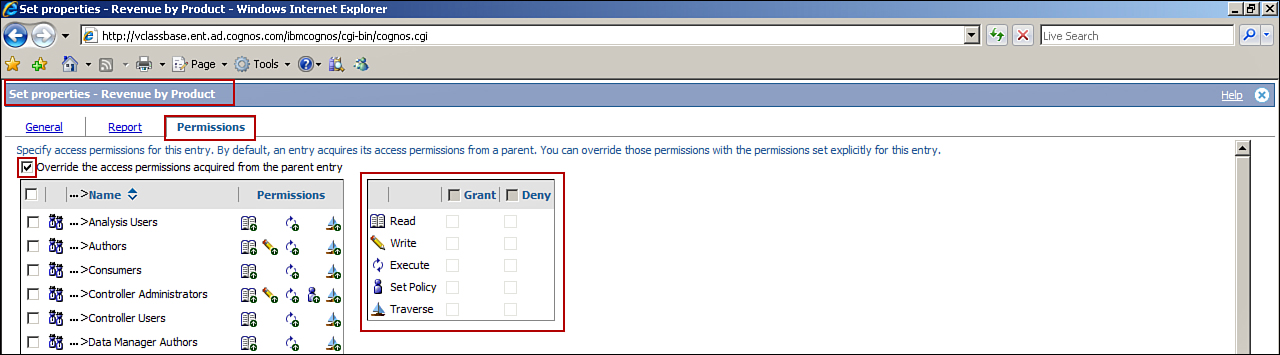
Figure 3.12. Permissions tab options.
To add, modify, or remove user groups and associated privileges, you must first check the boxOverride the access permissions acquired from the parent entry.
There are five permissions you can grant or deny access to users, groups, or roles. You can grant or deny Read, Write, Execute, Set Policy, and Traverse on any entry if you have permissions to do so:
• Read: Enables you to view all the properties of any entry and create a shortcut to an entry.
• Write: Enables you to modify properties of an entry, delete an entry, create entries in a folder or package, create new outputs for a report, and modify report specifications of a report created usingReport Studio and Query Studio.
• Execute: Enables you to run agent, metrics, and reports for data source connections and sign-ons entries can be used to retrieve data from the data provider.
• Set Policy: Enables you to read and modify security settings of an entry.
• Traverse: Enables you to view general properties of the container, that is, a folder or package without full access to the content and view contents of folder or package. For example, you must have Traverse permission for the folder to access the reports in the folder. This holds true for packages, groups, roles, namespaces, and capabilities.
Run with Options
Run with options enables you to print, save, or view the report. Use this option to specify the Format, Accessibility, Language, Delivery, and Prompt values, as shown in Figure 3.13. These options are valid only for the current run. Like most options available in Cognos Connection, all users can use the Run with options (by default), unless the permissions are changed by the BI Administrator or the Directory Administrator.
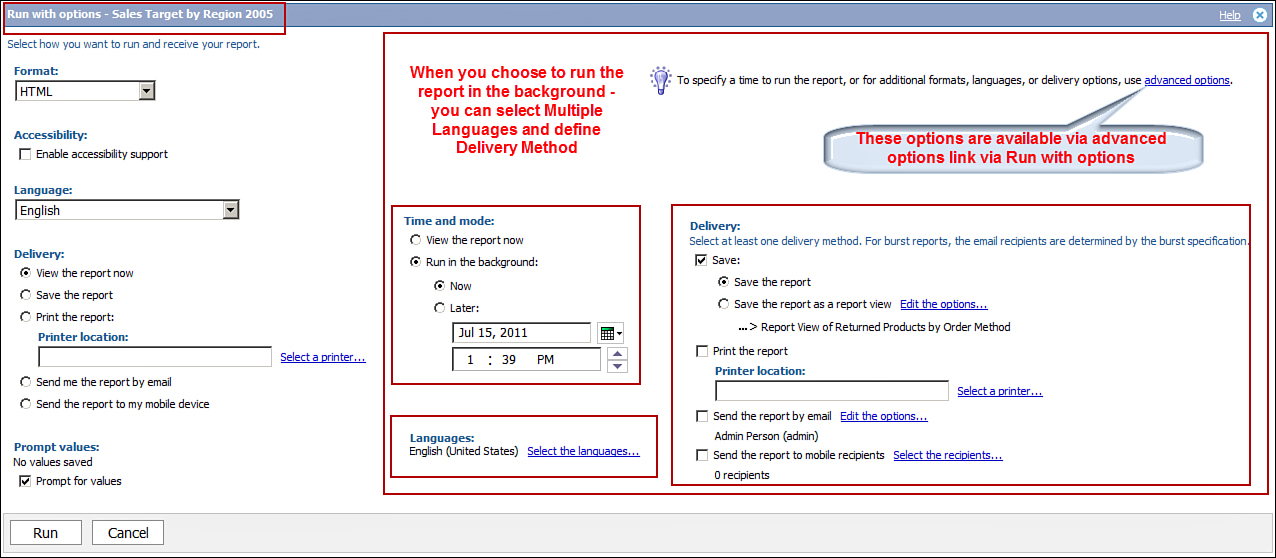
Figure 3.13. Run with options and the Advanced Options.
• Delivery: You can specify your report delivery options as one of the following via radio buttons:
• View the report now (default): Enables you to view the report immediately after it is run.
• Save the report: Enables you to save the report to view later or share with others.
• Print the report: Enables you to print a hard copy of the report.
• Send the report by email: Enables you to share the report with others via email.
• Send the report to my mobile device: Enables you to send the report to your mobile device. This option works only if you have IBM Cognos Mobile installed.
NOTE: If you require sending the report to multiple people or in multiple languages, you must use theRun with Advanced options discussed here.
• Advanced Options: Most options available here are the same as the Advanced options via theReport tab options in Set Properties, discussed earlier in this section.
• Time and Mode: Enables you to choose if you want to view the report now or run the report in the background. For example, you can run reports that retrieve a large volume of data at a later time during off-peak hours. You must specify the date and time the report should run.
• View the report now: Shows the output of the report in Cognos Viewer immediately after it runs
• Run in the background: Provides the following additional choices:
• You can choose multiple formats and languages.
• You can password protect the PDF.
• You can save the report as a report view.
• Send the report via email to a group of people along with the email text with formatting options. You can either attach the report to the email or send the report link so that users can log on to Cognos Connection and view the report or both.
Open with Report Studio
This option enables you to open the report in Report Studio. Typically, report developers and authors use this option to maintain reports. As mentioned earlier, this icon can vary depending upon the tool used to create the entry. Also, this option displays only if you have been granted permission to use the Studio that was used to create the entry.
Create Report View
You can create a report view via the More... link or by using the Create a Report View of This Report...option. This option is useful when you want to use the same report. However, if you want it in another format, a different delivery method, different prompt values, or a different language, you can create a report view of a report and schedule it to run at another time and in another language and another format, for example, PDF as default format. If the original report from which you created the view is moved to another location or deleted, the report view becomes unusable and shows up as a broken link. You should re-create the report view in such situations.
To create a report view, follow these steps:
1. Click Public Folders > SampleOutdoorReports folder. Locate the report Revenue by Product.
2. Click the Create a report view for this report icon under the Actions column for the report entry, for example, Revenue by Product.
3. In the Specify a Name and Description – New Report View Wizard window > type a name for your report view, for example, Revenue by Product (Thai) > provide a description (optional) and screen tip (optional).
4. Select the location where you want to create the report view, and choose Public Folders >SampleOutdoorReports folder.
NOTE: If you do not have permissions to save it in Public Folders, choose My Folders for this example.
5. Select Finish to complete the creation of the report view.
6. Click the Set Properties for the report view; then navigate to the Report view (middle) tab.
7. Select the check box Override the default values.
8. In the Report Options > Language section > select the drop-down list.
9. Change the Language to Thai (Thailand).
NOTE: You can change any of the report view properties; this example language is used to demonstrate the scenario when creating a report view is helpful.
10. Click OK to accept the changes.
11. Click the report view to view the report; the data and report headers are displayed in Thai.
NOTE: The report shows in Thai because the translation tasks required were done during metadata modeling and translated data is available.
12. Close the report.
Schedule
You can create a schedule for an entry to run it at a later time or automate the report distribution process. This is especially useful to run large reports off-peak hours, when possible. A report can have only one schedule at any time. If you require multiple schedules for a report, you must create report views and then create a schedule for each of the report view, as shown in Figure 3.14, for a Report View of Revenue by Product report.
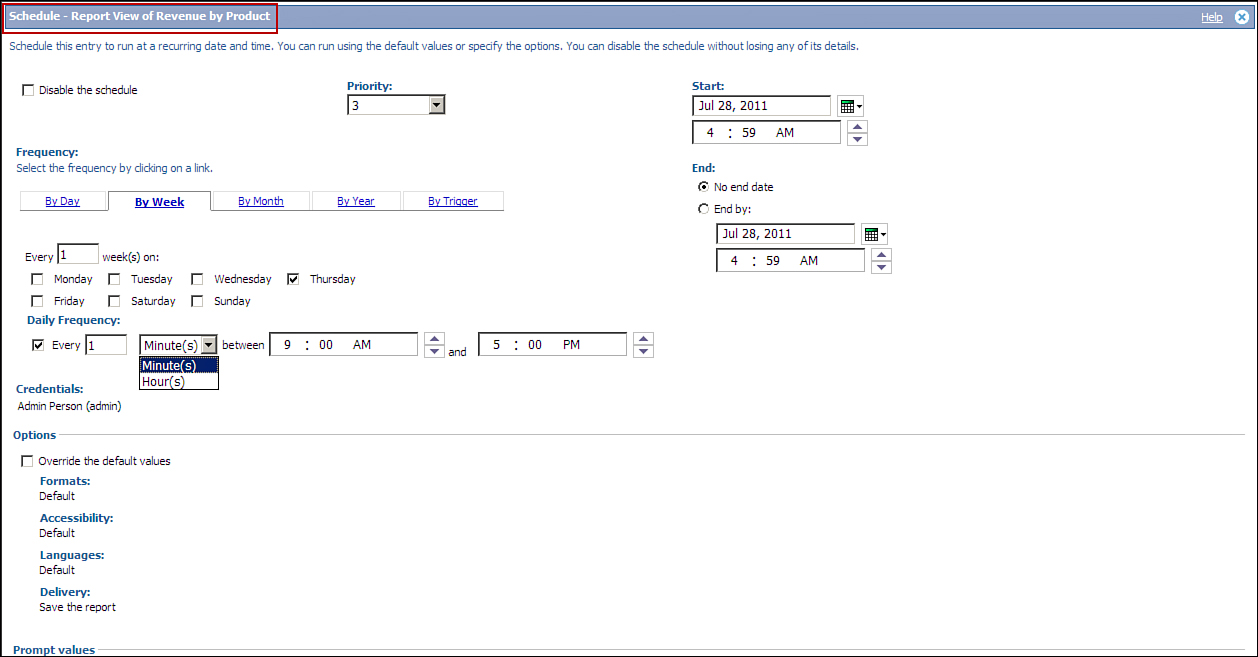
Figure 3.14. Define schedule for Report View of Revenue by Product report.
To create schedules, you must have appropriate permissions to run the entry. In addition, to save the schedule you must have write permissions on the folder in which the entry will be saved.
The BI Administrator can set permissions on the various scheduling options such as Schedule by Day,Schedule by Hour, Schedule by Minute, Schedule by Month, Schedule by Trigger, Schedule by Week,Schedule by Year, and Scheduling Priority to allow or deny users to set schedules at these intervals. Too many tasks running every minute or second may negatively impact the system performance during peak hours.
Figure 3.14 shows some of the options available to you during scheduling.
The options available to you from the Schedule window follow:
• Disable the schedule: Check this box if you want to temporarily disable the schedule.
• Priority: Enables you to specify the priority of tasks scheduled. For example, a task with priority 1 runs prior to a task with priority 3. If there are multiple tasks with priority of 3, the one that got into the queue first is executed first. Default priority of 3 is assigned to all activities.
NOTE: You can set the priority if you have been granted the Scheduling Priority capability by the BI administrator.
• Start: Start date and time when the schedule becomes effective.
• End: This has two options:
• No end date: for ongoing activities
• End by: For activities that run during a defined time period, such as Dec 31, 2011, 5:20 p.m.
• Frequency: Enables defining the frequency for the schedule. You can define the schedule By Day,By Week (default), By Month, By Year, and By Trigger.
• By Day: Enables you to define the schedule every n minutes, every n hours, or every n days.
• By Week: Enables you to define the schedule every n weeks on Monday, Tuesday, Wednesday, Thursday, Friday, Saturday, and Sunday. These options are check boxes, so you can enable multiple or all days of the week.
• By Month: You can specify the monthly schedule in either of the two ways available to you:
• Specify the First/Second/Third/Fourth/Last day of the week, that is, Monday/Tuesday/Wednesday/Thursday/Friday/Saturday/Sunday of every n month(s), for example, the second Thursday of every 1 month(s).
• Specify the day, that is, 1/2/3.../31 of every n month(s), for example, Day 14 of every 1 month(s).
• By Year: Specify the yearly frequency in any of the two available ways:
• The First/Second/Third/Fourth/Last day of week, that is, Monday/Tuesday/Wednesday/Thursday/Friday/Saturday/Sunday of every month name, such as January/February/...December, for example, the second Thursday of every July.
• Specify the Day 1/2/3/...31 of every month name, January/February/.../December, for example, Day 14 of every July.
• By Trigger: If you want to use a trigger, you must provide the name of the trigger.
• Daily Frequency: You can identify a schedule as a daily schedule via the Daily Frequency check box. This enables you to define how often (in minutes or hours) the schedule should run between the time period of the time range that you provide, such as 9:00 a.m. and 5:00 p.m.
• Credentials: Shows the credential of the person defining the schedule.
Additional options are available here: Formats, Number of rows per Web page, Enable selection-based interactivity, set password for PDF Files, Accessibility, Languages, Prompt values, and Delivery, when you select the check box Override the default values. All these options were also available to you via Set Properties in the Report tab option discussed earlier. For details refer to the previous section, “Report Tab Options.”
The Override the default values check box (refer to Figure 3.13) enables you to define or change the current setting for the following options:
• Format: Refer to the Report tab options in Set Properties, earlier in this section.
• Accessibility: Refer to the Report tab options in Set Properties, earlier in this section.
• Languages: Refer to Report tab options in Set Properties discussed earlier in this section. You can select multiple languages from here.
• Delivery: You must choose at least one delivery method.
• Save: The check box provides two options:
• Save the report
• Save the report as a report view, Edit the options... link enables you to provide a name and location for the report view.
• The Print the report check box enables you to define the printer location and Select a printer....link enables you to select an existing printer or add new printer information for directly printing from the IBM Cognos BI environment.
• The Send a link to the report by email check box enables you to send the report/report link to additional names as Cc: or Bcc via the Edit the options... link. From here you can also modify the subject line of the email, format the text, and more. An additional two check boxes are available:
• Include a link to the report: Sends the report link so that users with valid credentials can log on to the IBM Cognos BI environment and access it from there.
• Attach the report: You can attach the report for users who do not have access to the IBM Cognos BI environment or usually work disconnected from the Cognos servers.
• Send the report to mobile recipients check box: Enables you to send the report to users’ mobile devices. Use the Select the recipients... link to select users from the authentication source.
• Prompt Values: Refer to the Report tab options in Set Properties, discussed earlier in this section.
To create a schedule, follow these steps:
1. Navigate to Public Folders > SampleOutdoorReports folder > locate Report View of Revenue by Product > click the Schedule icon under the Actions column for the entry.
From the Schedule – Report View of Revenue by Product window, define the schedule.
2. Specify the Priority of the schedule, anything between 1 and 5; 1 is the highest priority.
NOTE: This option displays only if you have been granted permissions by your BI administrator to modify the priority.
3. For the Start, select the date and time you want the report to run.
4. Specify the Frequency of your schedule, such as By Day or By Month.
5. Specify Daily Frequency, if applicable.
6. Specify the Formats and Delivery options.
7. Specify prompt values, if applicable.
8. Click OK to accept changes.
NOTE: For an already existing schedule, you can check the Disable the Schedule check box to disable it rather than delete schedules that you might need to work with again at a later date.
More...
The More... option lists all the available actions for the entry. The options available include those listed in the Actions column and some additional options, shown as option 33 in Figure 3.8. As mentioned earlier, the options available in the Actions column for the entry can vary depending upon the type of entry, for example, the options available will be different for folders, reports, workspaces, and so on. In addition, the Available actions list via the More... link can also vary depending upon the entry, that is, for saved reports you may have additional actions such as View most recent report in HTML, View report output versions, and such. The options available to you on this screen are also available to you from other places in Cognos Connection.
The options available via the More... link and under the Actions column vary depending upon the actions performed on the entry. For example, you may see the View run history or View report output versions options if the report were run in the background and saved output versions are available.
Figure 3.15 shows the More... options for a Report and Report View.
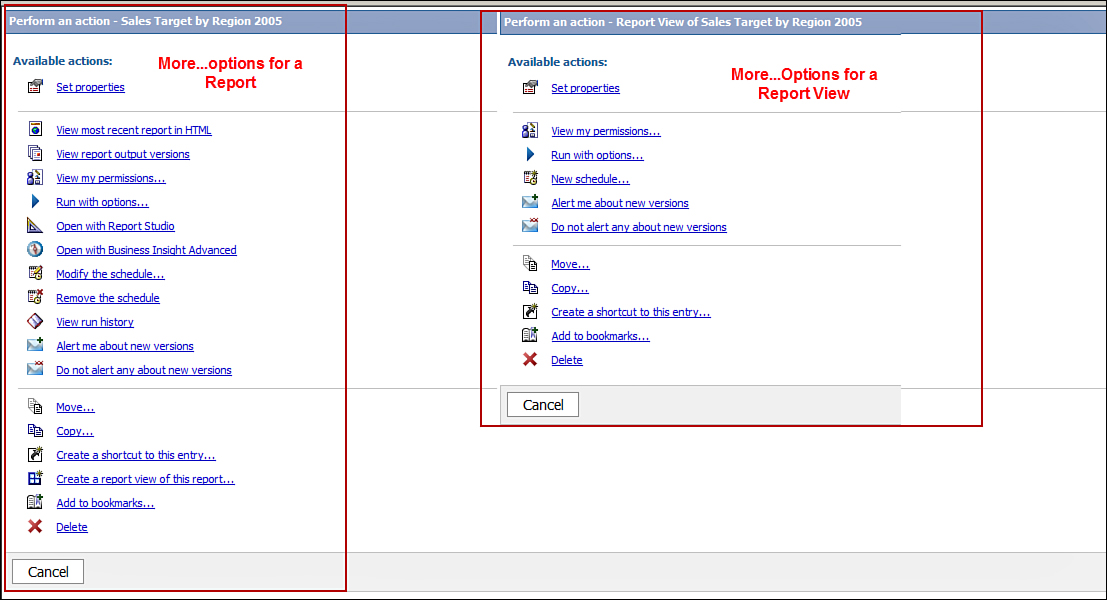
Figure 3.15. More... options for Report and Report View.
Each of the options available for a report entry is discussed in the following sections.
Set Properties
View Most Recent Report in HTML
This option displays for those entries that have reports saved in HTML format. Clicking this link opens a saved HTML version of the report in Cognos Viewer.
View Report Output Versions
This option displays for an entry only if there exists a saved output version of the report. You can use the view report output version via the More... in the Actions column or by clicking the stacked pages icon under the Actions column in the report. This option enables you to view historical data from your previous report runs. Clicking this link opens the page from where you can select the version you want to work with, as shown in Figure 3.16. Clicking the HTML link opens the saved HTML report in Cognos viewer. You can return to the previous screen by clicking the Return icon on top right of the screen.

Figure 3.16. View report output versions for report Sales Target by Region 2005.
You can view the report output from previous dates by selecting the date. The Manage versions link enables you to view all the output dates and delete the outputs you do not need anymore. By default the list contains report outputs for the language defined in the content locale.
When you run the report, an output version is created. The number of versions you can have depends upon the property setting on the Report output versions setting of the report, in the Report tab of Set Properties.
View My Permissions
The View My Permissions option shows the permissions you have for this entry, for example, Read,Write, Execute, Set Policy, and Traverse. For additional information on each of these permissions refer to Chapter 12.
Clicking this option displays the permissions you have on that entry.
Run with Options
Refer to the section “Run with Options” discussed earlier. This option is shown as 29 in Figure 3.8.
Open with Report Studio
Open with Cognos Workspace Advanced
Use this option to open the report with Cognos Workspace Advanced to create workspaces and more.
New Schedule
Refer to the section “Schedule” discussed earlier. The New Schedule option is shown as 32 in Figure 3.8.
View Run History...
You can view the run history via the More... option in the Actions column for the entry. The View run history option enables you to see the reports you ran and its statuses, that is, if they ran successfully or are still executing. The run history of the report is created when you save the report or run it in the background. This option provides the status of the entry as Canceled, Executing, Failed, Pending,Succeeded, Suspended, or All statuses. You can also view from here the Request Time, Start Time,Completion Time, and Status. You can view any errors or warnings that were generated during the run, via the View run history details icon in the Actions column of the View run history window. The option View outputs shown as a stacked pages icon under the Actions column of the View run historywindow enables you to view the report outputs. When you click the View outputs icon, the View output versions window opens for that entry. From here you can delete the versions you do not require by clicking the Manage Versions... link. In addition, the report output versions are listed. You can click the report to view the report. This screen lists the report outputs by the Format and Languages it is available in.
You can control how many occurrences or how long you want to keep the history from the Set Properties of the entry.
Alert Me About New Versions
Do Not Alert Me About New Versions
If you want to cancel your subscription to alerts on new versions of saved reports, you can click this link. After you click this link, you are not notified about new versions for the report.
Do Not Alert Any About New Versions
Clicking this link stops alerts on new versions of the report. Report authors can remove users from an alert list. After users are removed from the list, those users will not receive alerts when a new version of the report becomes available.
Move
Use the Move option to move an entry in Cognos Connection from one location to another within Cognos Connection, for example, from Public Folders to My Folders.
Copy
Refer to Copy under the “Toolbar Options, Actions, and Objects” section, earlier in this chapter, for more detail.
Create a Shortcut to This Entry
You can create a shortcut for an entry via the More... option in the Actions column. Shortcuts are pointers to objects in Cognos Connection. It is a useful way to create references to objects you use frequently in a location convenient, for example, My Folders. Because it is a pointer, any updates to the original entry are reflected in the shortcut entry. When the original entry is moved or deleted, the shortcut becomes unusable and shows as a broken link.
Following are the steps to create a shortcut to an entry:
1. Locate the entry you want to create a shortcut for, and click on More... under the Actions column, for example, Public Folders > SampleOutdoorReports folder > Revenue by Product report.
2. Click the Create a shortcut to this entry... link. The New Shortcut Wizard opens.
3. Provide a Name for the shortcut, such as My Revenue by Product.
4. Optionally provide a Description and Screen Tip.
5. Specify the Location where you want to create the shortcut. By default it will be created in the same location as the source object. Choose My Folders.
6. Click Finish to accept changes.
Create a Report View of This Report...
Add to Bookmarks
You can bookmark an entry using this option by doing the following:
1. Click Add to bookmarks link, which displays the Add a Favorite Window for Your Browser.
2. Add it to the favorite in your browser. Bring up a browser and access the entry from Favorites of your browser.
Delete
Refer to Delete in Toolbar options, Actions and Objects, covered earlier in this chapter for more information.
MY INBOX
You now explore the new IBM Cognos BI v10.1 feature: My Inbox. You can create ad-hoc tasks via theMy Inbox option. This option enables you to create a New Task or a New Notification. The tasks and notifications bring process control into your IBM Cognos BI environment. You can create tasks that you can assign to others and follow them as they go through to completion.
The following example illustrates tasks being assigned by the manager to a team member and follows them through completion. Michelle Butler is the marketing business analyst at the Sample Outdoor Company. Mary Miller who is the marketing manager at Sample Outdoor Company wants to assign the task to generate the monthly product sales report for the upcoming executive meeting to Michelle Butler. The following steps illustrate how to accomplish this task.
You can use any two users available in your environment in place of Mary Miller and Michelle Butler and follow along.
Steps to Create a New Task
1. In Cognos Connection, click My Area Options > My Inbox.
2. Click the New Task link to begin creating a task, as shown in Figure 3.17. You can then assign it to a team member and follow its status through to completion.

Figure 3.17. Create New Task or New Notification.
3. Click the Add /Remove recipients... link to assign a task to the Business Analyst, Michelle Butler, or another user in your environment, as shown in Figure 3.18.
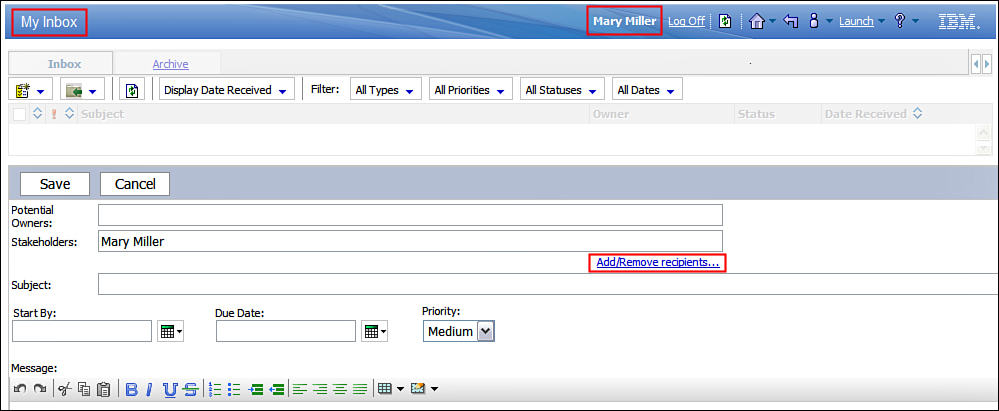
Figure 3.18. Create a new task.
4. Navigate to the namespace where your users reside; in the example, the users are inSampleOutdoor LDAP. Business analyst Michelle Butler is in the group calledMktBusinessAnalyst; you must navigate to the group that is relevant in your environment. Check the box Show users in the list, which will show the names of the individual users in the group. Select the check box for Michelle Butler, and click the Stakeholder button to identify Michelle Butler as the stakeholder for the task. Complete the assignment by clicking OK, as shown in Figure 3.19. If there are multiple assignments, you must pick each user from the relevant groups, as required.
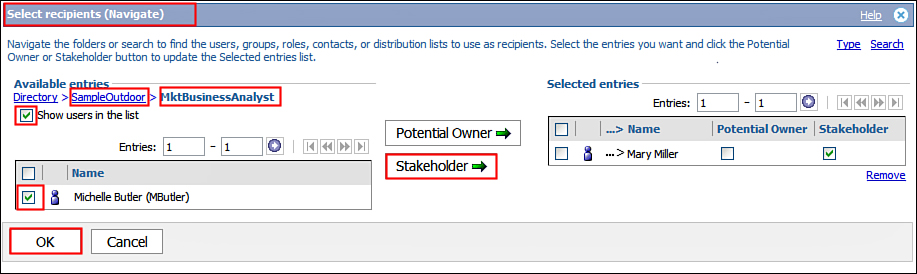
Figure 3.19. Select recipients for the new task.
You can then return to the original page where you started; notice Michelle Butler now appears in the list of stakeholders. You can add additional users, if required via the Add/Remove Recipients...link.
5. In the Subject line, type Product Sales Monthly Report.
6. Set the date that the task should Start and is Due by and the priority of high, medium, or low to the task. You can complete the task creation by clicking Save, as shown in Figure 3.20.
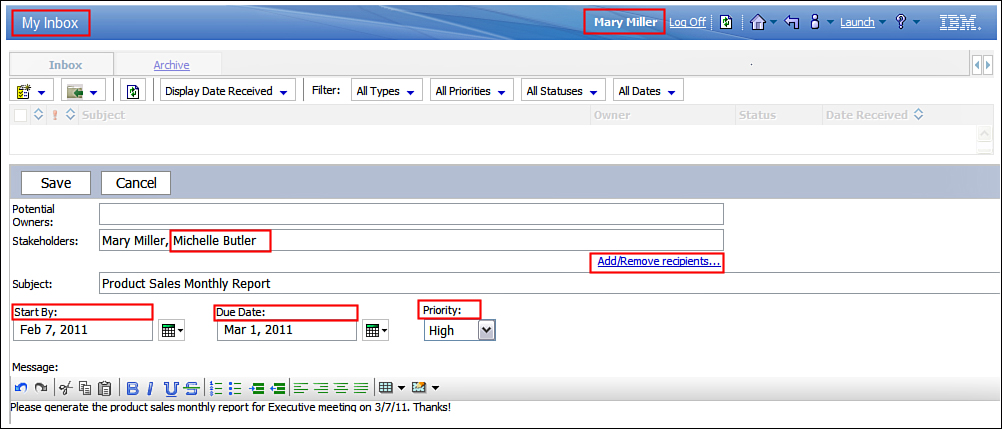
Figure 3.20. Define task recipients, start date, due date, and priority.
7. Following similar user assignment steps, you can assign Fumie Masuda, the finance manager, as the owner of the task. You could have done this at the same time by using the Potential Owner button (seeFigure 3.21). You can assign additional users in your environment, if required.
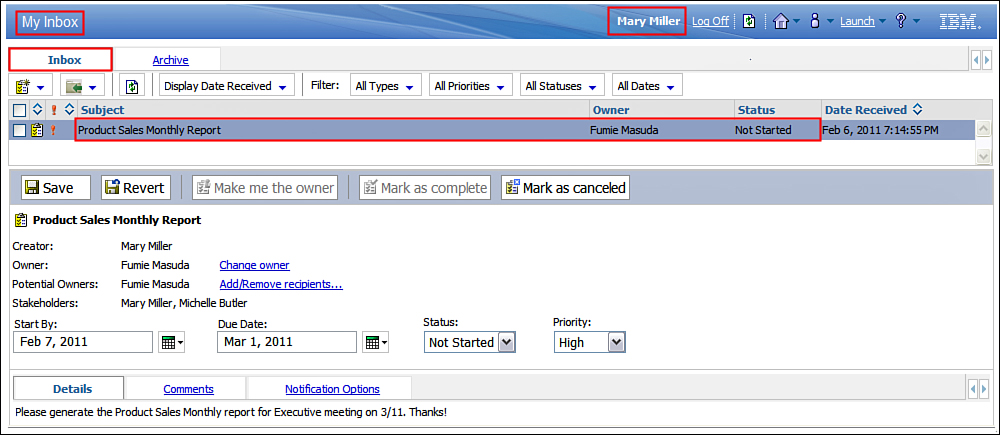
Figure 3.21. Check task status in the Inbox.
8. Referring to Figure 3.21, users have been identified as the creator, owner, potential owners, and stakeholders. Stakeholders can work with most options; although, they can cancel via the Mark as canceled button. However, the buttons Mark as complete and Make me the owner are unavailable (grayed out) for them and for Mary Miller who is the creator and stakeholder.
9. Figure 3.22 shows the three options available at the bottom of the screen as three tabs: Details,Comments, and Notification Options.

Figure 3.22. Working with Comments.
10. Navigate to the Comments tab. Examine the options available on two tabs: The left box enables you to add comments for others to take action, and the right box enables you to choose comment categories, such as User comments, Audit comments, and All comments.
• User Comments: This is the default and shows only comments added by users.
• Audit Comments: Displays comments stored in the system for creation of the task and who created it.
• All Comments: Displays both user comments and audit comments.
Notifications
Navigate to the Notification Options tab, which enables you to set your options for those you want to be notified of changes or of progress of the task. The options in Figure 3.23 are default options; if you want to be notified when a comment is added to the task, you must check the Comment box and similarly on any others that are meaningful to you.

Figure 3.23. Notification options
Following are the available notification options:
• Notify me if not started by the start date
• Notify me if not completed by the due date
• Notify me on change: Started, Owner changed, Comment, Completed, and Canceled.
Additional options and filters enable you to create a new task or notification and apply filters to focus on the tasks and notifications that you want to work with, as shown in Figure 3.24.

Figure 3.24. New task/notification and archive old/completed tasks.
The first icon in Figure 3.24 is used to Create a new task or notification. The second icon from the left is used to Archive old or completed tasks. When you archive, the entries move from the Inboxtab to the Archive tab. The third icon from the left is used to Refresh the page with any updates.
Display Date Received provides two options that enable you to see your entries by Display Date Received or by Next Deadline Date.
You can narrow the scope of the display to focus on the task that you want to work on by applying filters. Four filter options are available on four tabs: All Types, All Priorities, All Statuses, and All Dates, shown by default. You can narrow your focus by changing the options on each one as required.
• All Types: Provides you with three options that you can use to filter the display, Tasks, Notifications, and All Types.
• All Priorities: Provides you with four options—All Priorities, Low, Medium, and High.
• All Statuses: Provides you with five options—All Statuses, Not Started, Started, Completed, andCanceled.
• All Dates: Provides you with five options—All Dates, Last Day, Past Week, Past Month, and Past 6 Months.
In addition to the notification that you can receive via Event Studio when data changes occur, you can also set up ad-hoc notification here. Next, you explore how to create notifications. As the stakeholder you can set up the system to notify you if the task has not started by a certain date or if you want to follow up on the status of the task.
To create a new notification, perform the following steps:
1. Log in to Cognos Connection, if not already logged in, for example, Mary Miller or another user in your environment.
2. Click My Area Options > My Inbox.
3. Click the new task or notification icon (first from the left), refer to Figure 3.24, and choose New Notification from the drop-down list.
4. Add or remove recipients you want to notify. As shown in Figure 3.25, when creating notifications you can assign the recipients using the Add/Remove recipients... link, just like you did when creating a new task. The difference is when creating a notification you notify the list of users and can copy relevant people. You will be notified here as well as by your normal email server. Click Add/Remove recipients... link > navigate to the namespace where your users reside, such as SampleOutdoor LDAP > select the Show users in the list check box > select the check box(s) for the user(s) you want to notify, such as Fumie Masuda as To or Cc, as required > click OK.
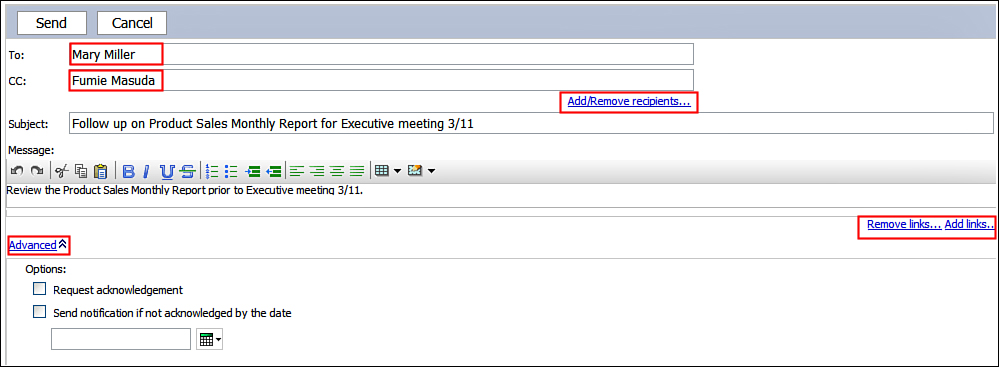
Figure 3.25. Add/Remove recipients.
5. Optionally the Remove links... and Add links... links on the bottom right of the screen (refer toFigure 3.25) enable you to include links to the existing reports in your IBM Cognos BI environment, if you want. Click Add links > navigate to Public Folders > SampleOutdoorReports folder > select the check box for Revenue by Product report > click the green right arrow to apply your selection > click OK.
NOTE: The link for the selected report is now included in the notification.
6. In the Advanced Options (refer to Figure 3.23), you can receive a notification when email has been read by people in your notification list. In addition, you can choose to be notified if your email were not opened/read by a certain date. You select the check boxes for Request acknowledgementand Send notification if not acknowledged by the date options to enable this feature. You must provide the date for Send notification if not acknowledged by the date option, after enabling it via the check box (refer to Figure 3.25).
Figure 3.26 shows the new notification you created and indicates that it has not been read yet.

Figure 3.26. Check status in the Inbox.
MY WATCH ITEMS
You can use watch items to set up alerts when new report versions are created and stored in the Content Store. You can then define watch rules to proactively monitor business events in your IBM Cognos BI environment.
This option enables you to manage watch items with alerts and watch rules, from a single location. Watch rules can be set up on numeric data in a saved HTML report. The watch rules are set up inCognos Viewer. For watch items to work correctly, you must first enable report properties that save additional context information on the reports. To receive alerts you must have a valid email address; otherwise, you can leverage the news item’s capability.
Set Up Alerts on Saved HTML Report
You can set up alerts to receive notification every time a new report version is saved.
To set up alerts on new versions of a Product Forecast report, you must first log on to IBM Cognos Connection, if not already logged on:
1. Navigate to the SampleOutdoorReports folder, and click the Set Properties under the Actionscolumn, for the Product Forecast report.
2. Navigate to the Report tab, and click the link Advanced options to view the advanced option selection.
3. Check the option Enable alerts about new versions, if not already selected.
4. Click OK.
6. Under the Delivery section, choose Save the report.
7. Click the Run button to run the report.
8. Click OK if you are presented with a Run summary page.
9. In Cognos Connection, click the My Area Options (option 7 in Figure 3.2) and choose My Preferences.
10. Navigate to the Personal tab.
11. In the Alerts section, type in the email address that should receive the alert. In this example, use the email address admin@grtd123.com.
12. Click OK.
13. In Cognos Connection, for Product Forecast report, click on the More... link (under Actionscolumn, option 33 in Figure 3.8).
14. Click the link for Alert me about new versions.
15. Click OK for the message This report will be sent to you by email every time a new version becomes available. All your alerts will be sent to admin@grtd123.com. You can change this email address by changing your preferences.
16. Under the Actions column, click Run with options (option 29 in Figure 3.8) for the Product Forecast report.
17. In the Delivery section, choose Save this report.
18. Click the Run button to run the report.
19. This sends email to the person whose email address was specified in step 11 notifying that a new version of the report is available.
You can check all the alerts you have set up from My Area > My Watch Items on the Alerts tab.
In your watch items, you can see the Source of the alert (Product Forecast report); Description(New versions become available); and Type (Email), as shown in Figure 3.27.

Figure 3.27. Check Alerts in Cognos Connection.
This tab on the top right has the icon (an envelope with a check) Remove Me from the List. You can use this option to remove yourself from the list, as shown in Figure 3.27. This cancels your subscription to the new versions of the report.
You can click the Return icon (the arrow pointing to the left on the top right of the screen) to return to the previous screen. The report has an additional icon resembling stacked pages for View the output versions for this report in the Actions column in Cognos Connection.
Enable Watch Rules for a Report
Adding a watch rule to your alert makes the alert conditional. You can set watch rules on numeric values in your saved HTML report. When the condition is met, an alert notification is sent by email or news item in Cognos Connection, depending on your selection.
Before you can set up the watch rules on a report, there are three things that you must do (refer toFigure 3.28):
• For the report, for example, Product Forecast, via its Set Properties > Report tab > Advanced options, select the check box for option Enable selection-based interactivity in HTML reports.
• For the report via its Set Properties > Report tab > Advanced options, select the check box for the option Enable enhanced user features in saved output versions.
• Run the report via Run with options > choose Save in the Delivery section, and Run the report to save it in HTML format.

Figure 3.28. Options that you must enable to use watch rules.
Enabling these two features causes additional context information to be stored. After you complete these three tasks, you can then create your watch rules.
Steps to Create Watch Rules
To create watch rules, follow these steps:
1. In Cognos Connection navigate to the report on which you want to set up watch rules, for example, Product Forecast in the SampleOutdoorReports folder.
2. Click the Set Properties > Report tab > Advanced options for the report to ensure the following are enabled. If not, check the box and enable them, as shown in Figure 3.28.
• Enable selection-based interactivity in HTML reports.
• Enable enhanced user features in saved output versions.
3. Click OK to accept changes.
4. From My Area > My Preferences > tab, in the Alerts section, ensure a valid email address exists. If not type it now, for example, admin@grtd123.com. You must use a valid email address in your environment.
5. Click OK to confirm changes.
6. For the Product Forecast report, click Run with options under the Actions column.
7. In the Delivery section of the Run with Options window, click Save the Report.
8. Click the Run button to run the report.
9. Click OK.
10. Refresh the page; you should see the icon for View the output versions for this report (with stacked pages under the Actions column) for the Product Forecast report.
11. Click the HTML link to open the report.
12. Click Forecast Revenue (any numeric column in your report).
13. On the top right of Cognos viewer, click the link Watch new versions.
14. Click the link Alert Using New Watch Rule to add your watch rule condition, as shown inFigure 3.29.
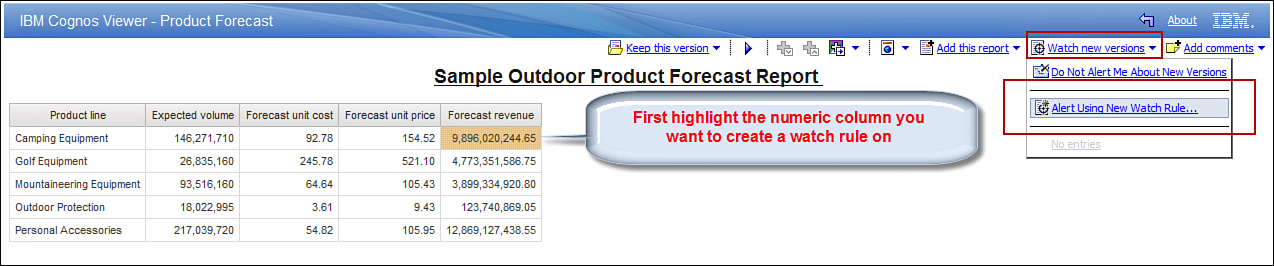
Figure 3.29. Set up the watch rule in the saved HTML report.
This displays the window to define your watch rule.
You can create your watch rule based on either of the two options:
• Send an alert when the report Product Forecast contains: the selected column will appear here with operators you can select from.
• Send an alert based on thresholds.
15. In the Specify the Rule window, you can define your rules using the operators from the list. Notice that the numeric value used to build the rule is the one you highlighted in the report prior to choosing the Alert Using New Watch Rule link in step 11.
16. You want to be notified when the sales target is met, that is, >= the value in the column. The check boxes on the bottom of the screen are used to provide the context; these are report items from the report. Choose the appropriate operator for your watch rule.
17. Click Next to proceed.
18. You are now on the Specify the alert type – Alert Using New Watch Rule window. From here you can choose your method for notification, as shown in Figure 3.30.

Figure 3.30. Specify Alert Type when creating watch rules.
You have three options; you must check the box for the way you want to be notified in the Alertcolumn:
• Send the report by email: Enables you to send the report via an email, by default. Depending upon the selection you make for Send email options via the Edit the options... link, the text in this window changes. For example, if you select the check box for Include a Link to the Report option; your selection displays in this window, that is, Send a link to the report by email. And if you select both the check boxes, for example, Include a link to the report and Attach the report options, the window displays Send the report and a link to the report by email. Depending on the selection you make, you either receive the report by email or the report link via email or both. You can also type text in the email body, include the report link in the email by selecting the check box for Include a Link to the Report option, and define your subject line. You can edit the default options via the Edit the Options... link. Using this option the email is sent to the person whose email was specified in step 4.
• Publish a news item: This option enables you to change the default headline for the news item and provide a screen tip and text. Choose the location for the news item, that is, My Folders or another location. You can edit the default options via Edit the options... link.
• Send a notification: Enables you to notify additional people including the person whose name is specified in the alert section, for example, admin@grtd123.com. As the name suggests, use this option when you want to notify others or you want to be notified if the email sent out was acknowledged by the recipient(s). Using this option you can include the link to the report by selecting the check box Include a link to the report option, so users can log in to see the report in Cognos Connection. You can also specify the priority as high, normal, and low. You have additional options available to you that you can enable via the check box, that is, Send notification by email upon creation, Request acknowledgement, and Send notification if not acknowledged within ndays. You can edit the default via Edit the options link.
19. Click Next to proceed.
20. Click Finish.
21. Click the Return button on top right of the screen.
22. Click the Run with options, choose Save the report from the Delivery section, and Run the report.
23. If presented with the Summary of your choices, click OK.
24. Click My Area Options > My Watch Items.
25. Navigate to the Rules tab; you can see all the watch rules you have set up. You can enable or disable the rules from here as well as edit them via the Set Properties option under the Actionscolumn, as shown in Figure 3.31.

Figure 3.31. Watch rules created for alert and notification.
Watch Rule Threshold
While defining watch rules, you can define the context of your watch rules via the option For the Selected Context. You can pick from one of the two radio button choices:
• Send an alert when the report ‘column name’ contains: Enables you to define rules using the column you highlighted, as shown in Figure 3.32. You must also specify how you want to be notified, for example, Send the Report by Email, Publish a News Item, and Send a Notification. You can select the ones applicable via the check boxes in the Alerts column, as shown in Figure 3.32.
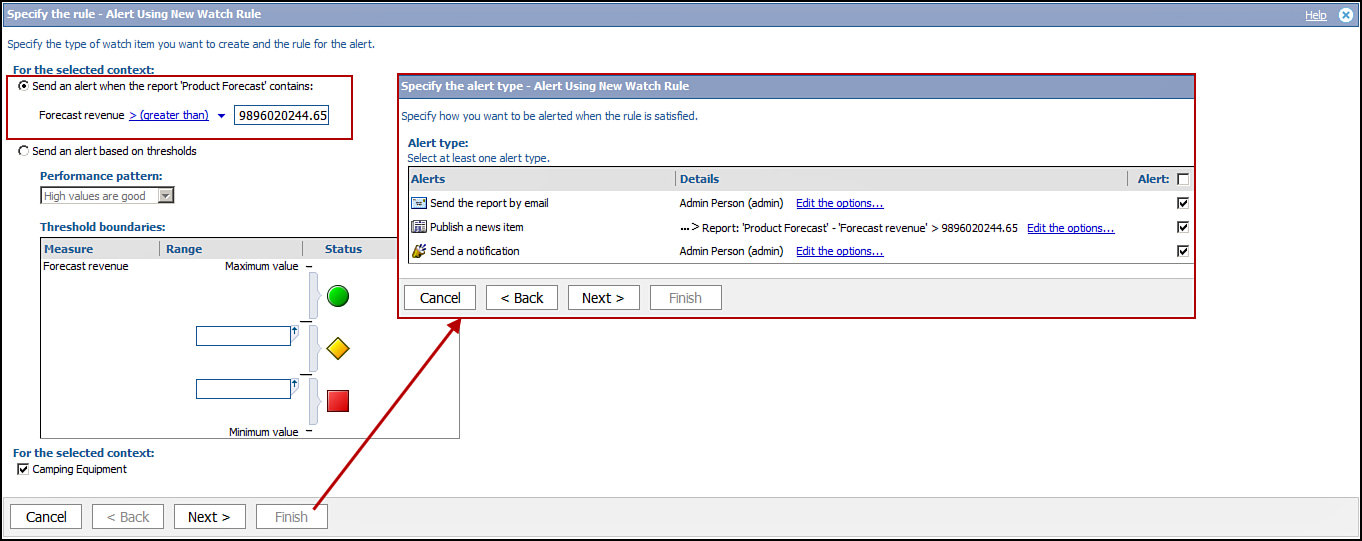
Figure 3.32. Set watch rules on a saved HTML report.
• Send an alert based on thresholds: You must define the Performance pattern andThreshold boundaries, as shown in Figure 3.33. When you use this option, you can choose to be alerted when the condition matches Red, Yellow, or Green conditions, as shown in Figure 3.33.

Figure 3.33. Set watch rules using Threshold boundaries.
ADD COMMENTS ON SAVED REPORTS
You can collaborate with others on a report using comments via IBM Cognos Viewer. You can add comments on saved HTML, PDF, and XML reports, however, not on a Microsoft Excel spreadsheet or CSV reports. Before you can add comments on the saved reports, you must enable the property: Enable comments in saved output versions. Comments are available only in the version of the reports you added them to; if you delete that version of the report, the comments will be lost. When you rerun you should add the comment on the new version if you require it.
To add comments on Saved HTML reports, follow these steps:
1. Log on to IBM Cognos Connection, if not already logged in.
2. Navigate to the report, for example, Product Forecast in the Public Folders > SampleOutdoorReports folder.
4. Navigate to the Report tab, and click the Advanced options link.
5. Check the check box for Enable comments in saved output versions.
6. Click OK.
7. In the Actions column, click Run with options. In the Delivery section, select Save the report.
8. Click the Run button to run the report. This will generate a new saved version of the report on which you can add comments.
9. Click the report name Product Forecast; the report opens in IBM Cognos Viewer.
10. In IBM Cognos Viewer, click Add comments link (on the top right).
11. Provide a name for the comment in the Comment section.
12. Click Finish.
13. Click the Add comments link (top right in IBM Cognos Viewer).
14. In the list the comment you added in step 9 displays. Click the comment; from here you can View,Modify, or Delete the comment. Click Delete.
15. Click OK for Are you sure you want to delete this entry? (Or click Cancel to change your mind.)
NOTE: If you want to collaborate using comments on a saved report, you can optionally use Cognos Workspace, which has enhanced and flexible options to provide comments on a saved output.
MY PREFERENCES
My Preferences is available under My Area Options in the IBM Cognos Connection, as shown inFigure 3.34. You can use this tab to configure your portal preferences. This is unique to each user.

Figure 3.34. Set up My Preferences in Cognos Connection.
You can change the look and feel of IBM Cognos Connection and personalize it by changing your preferences. My Preferences provides three different options: the General tab, Personal tab, and the Portal Tabs. The changes you make here take effect immediately in the current session and are saved for future sessions until you change them again. These changes impact your session only, and others are not impacted by the change. The following sections describe the options for these three tabs.
General Tab
The General tab provides you with several options that impact the look and feel of Cognos Connection for your session, as shown in Figure 3.35.
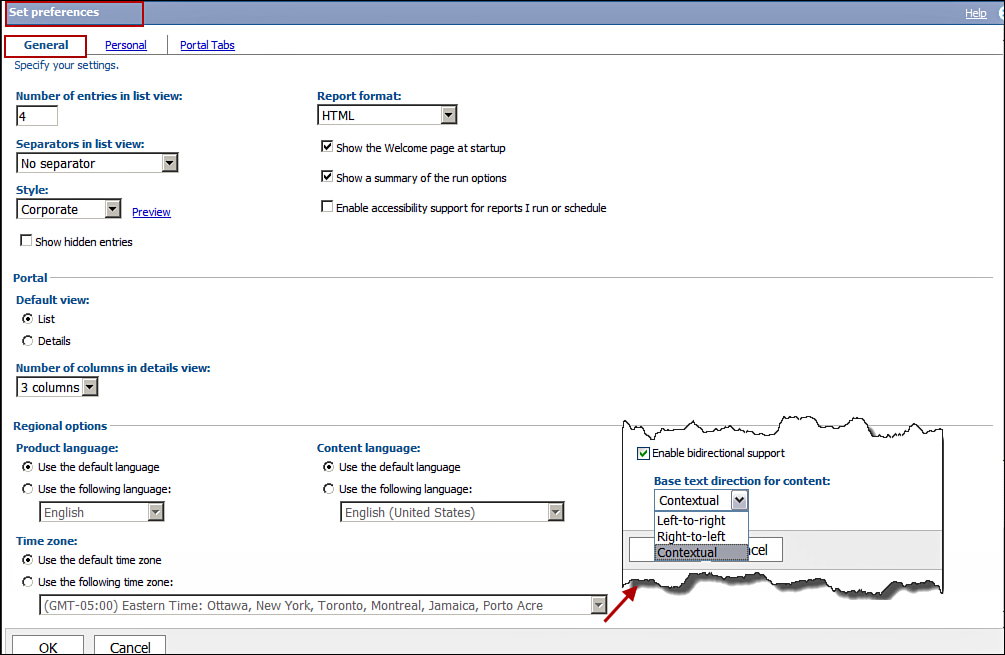
Figure 3.35. General tab options in My Preferences.
The options available to you are discussed here:
• Number of entries in list view: Enables you to specify the maximum numbers of rows you want to show in the list before scrollbars are required. This is applicable to rows where scrolling is required.
• Separators in list view: Enables you to choose the method to separate entries that appear in a list and is applicable to entries in both Public Folders and My Folders. You can choose from no separator,grid lines, or alternating backgrounds that are applicable when using Microsoft Internet Explorer or Firefox. The only exception to this is the output versions list.
• Style: Enables you to change the look and feel of all components of IBM Cognos software. Certain standard styles are available to you via a drop down list, for example, Business, Classic, Contemporary,Corporate, Modern, and Presentation. When you change the style to a one that is different from the default style, the changes affect your sessions only and take effect immediately. Cognos BI V10.2 allows you to create new styles you can choose from the drop-down list. For more information refer to the section “Skin Management,” later in this chapter.
• Show hidden entries: The administrator can hide some entries such as reports and packages from your view. However, if you want to see the hidden entries, you can select this check box. When you do this you see that the hidden entries now show up with grayed icons. Clearing this check box removes the hidden entries from your view.
Hiding entries does not impact permissions set on them. You can see this setting only if you have been granted access to the Hide Entries capability by your administrator.
• Default view: You can choose from List view or Details view as your default view. List view shows the name, modified date, and actions, whereas Details view provides additional details on the entries such as name, description, modified date, and possible actions. Details view works in both the Public Folders and My Folders; however, in other components List view is used.
• Number of columns in detail view: The number of columns per row for details view. Choosing 2 shows all the entries in 2 columns per row.
• Report Format: You can specify your preferred format to view the report. You can choose fromHTML, PDF, Delimited Text (CSV), Microsoft Excel Spreadsheet Software, and XML. HTML is the default format.
• Show a summary of the run options: Select this check box when you want to see the summary of the run options for reports that are not run interactively.
• Show the Welcome page at Startup: Select this check box if you want the welcome page to display at the beginning of a session. Unchecking it hides it.
• Enable accessibility support for reports I run or schedule: Select this check box to create accessible report output whenever you run or schedule a report.
• Product language: Select the language to be used by the IBM Cognos user interface. This applies to all IBM Cognos components, such as IBM Cognos Connection, IBM Cognos Viewer, and Report Studio. You can use this to set your UI language. Although you can change your UI preference to a language you prefer, the underlying data continues to show in its default language as stored in the database until it is modeled to support multiple languages, especially the one to match your selected UI language (Figure 3.36).
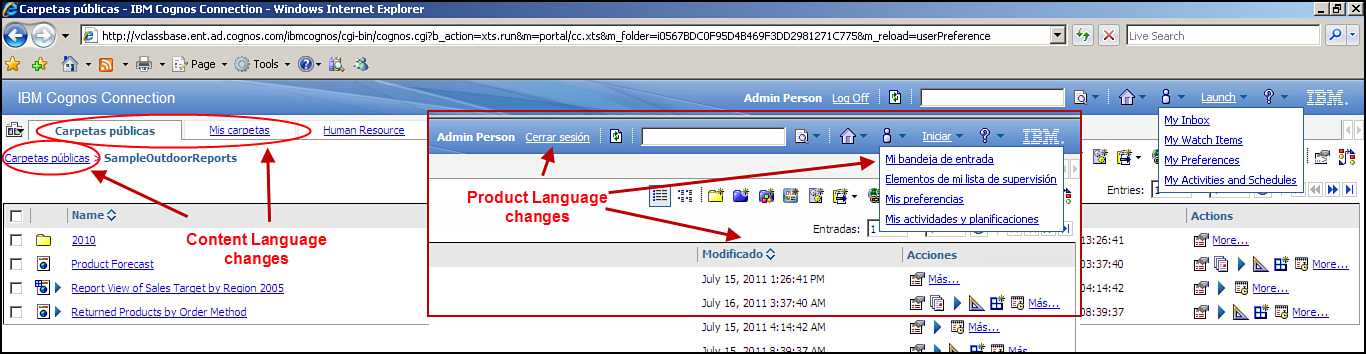
Figure 3.36. Product Language and Content Language settings.
• Content language: Select the language to view and produce content in IBM Cognos software, for example, data in reports, names, and description of entries. Refer to Figure 3.36.
• Time Zone: Specify the time zone you want to use for your session.
• Enable bidirectional support: Cognos 10.2 provides bidirectional language support, for example, for Hebrew, Arabic, Urdu, or Farsi. This feature is aimed at report consumers. You can enable bidirectional support in the Set Preferences window > Regional options section. To enable this feature you must select the check box Enable bidirectional support. After you select this check box, you can now specify the Base text direction for content option by choosing from one of the three options available Left-to-right (default), Right-to-left, or Contextual from the drop-down list. The choice you make here will be reflected in Cognos Connection, Cognos Viewer, and Cognos Workspace(refer to Figure 3.35). When you specify the choice Contextual, the text direction is determined by the first alphabet character in the text you typed. For example, if the first character you typed belongs to a bidirectional language, the direction is Right-to-Left. Bidirectional support includes bidirectional text, digit shaping associated with rendering Arabic numbers, and report layout mirroring associated with transforming charts, lists, or maps to allow the content to be viewed from right to left.
Personal Tab
The Personal tab, as shown in Figure 3.37, displays settings that you can see only if you have read permissions for your account.

Figure 3.37. My Preferences – Personal tab options.
Options available in the Personal tab are as follows:
• Primary logon: Your primary logon is the namespace and credentials you used to log on to IBM Cognos software.
• Secondary logon: Shows the list of secondary logons. Secondary logons exist only if you logged on to multiple namespaces.
• Alerts: Use this to specify an email address for alerts. The delivery service processes use the email address specified here to send alerts. If there is no email address here, the email is sent to the email address specified in the primary logon section.
• Credentials: Used to provide authorization to other users, groups, and roles to run entries using the credentials. Remember to RENEW the credentials after you change your password. A list of secondary logons display; this is true if you have logged on to multiple namespaces.
You can manage your datasource credentials without depending upon the administrator. For details on how to set up trusted credentials, refer to the section “Trusted Credentials or Proxy” in Chapter 12.
• Groups and Roles: Displays the groups and roles associated with both your primary and secondary logons. This basically tells you the Cognos groups and roles you belong to and thus your authorization in the IBM Cognos BI environment, as shown in Figure 3.38.
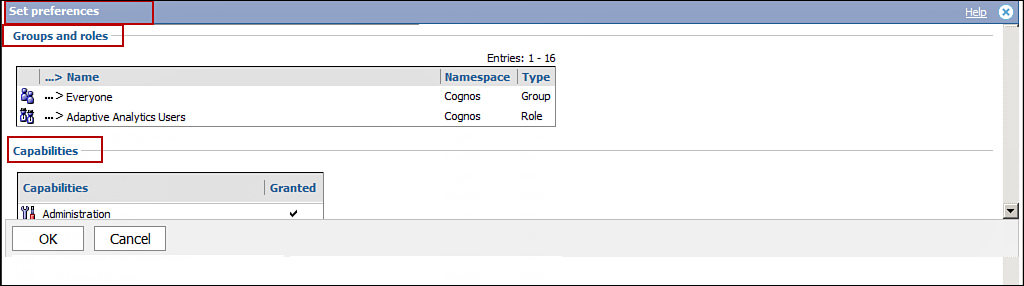
Figure 3.38. My Preferences – Groups/Roles and Capabilities setting.
• Capabilities: Displays a list of secured functions and features that you have authorization to use based on your primary and secondary logons (refer to Figure 3.38).
Portal Tabs
Portal Tabs settings appear only if you have read permissions for your account. Because the logged on user has access to Finance and Human Resource tabs, they show up in the list here, as shown in Figure 3.39.
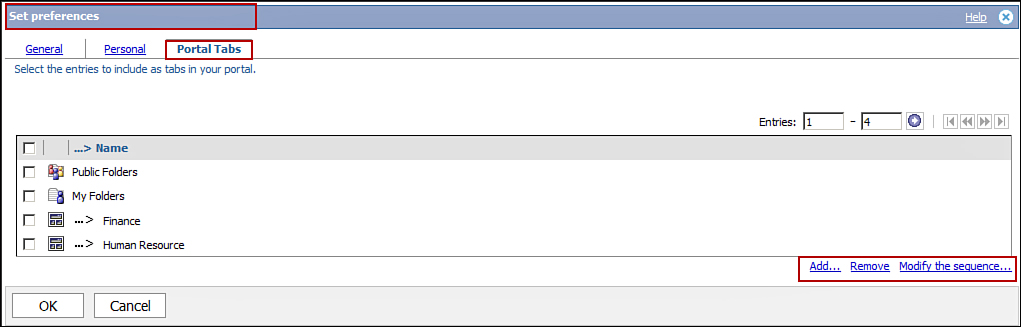
Figure 3.39. My Preferences – Portal Tabs options.
The settings for the Portal Tabs follows:
• List of entries: Shows the Portal Tabs, including Public Folders and My Folders in your IBM Cognos BI environment.
• Add: Enables you to add a tab for a specified page in IBM Cognos Connection.
Each tab in Cognos Connection maps to an option represented here, such as Public Folders, My Folders, or a page created by the user.
• Remove: Enables you to remove a Portal Tab from your IBM Cognos Connection environment. This impacts your session only. Select the check box for the Portal Tab you want to remove, and then click the Remove link.
• Modify the sequence: You can use this link to change the order in which Portal Tabs appear in IBM Cognos Connection. Remember, by default this impacts only your session.
User Created Portal Tabs
You can add your own pages, that is, Portal Tabs to customize Cognos Connection for your IBM Cognos BI implementation. Click the Add a new page (icon 10 in Figure 3.8) to first create the page, and then add the tab next to My Folders in Cognos Connection using the Tab Menu, as shown as 17 in Figure 3.8
Examine options 18 and 19 in Figure 3.8. Finance and Human Resource pages were added to organize the content by department. Portal Tabs are like any other object in Cognos, and you can set properties on them as required. For example, you can secure the Finance tab to allow only Finance department employees to access its content and likewise for the Human Resource tab. In addition, you can make these pages the landing page for users, for example, when Finance department employees log in they will directly land on the Finance tab. By default users always land in the Public Folders when they log on to IBM Cognos Connection.
To create a Portal page, follow these steps:
2. Give it a Name, for example, Finance, and a Location, for example, SampleOutdoorPortalfolder or any other folder in your environment; optionally specify description and screen tip.
3. Click Next.
4. From the page Set columns and layout – New Page Wizard, choose the number of columns you want, choose 2, and change the Column width for the first one to 50%, and the second to 50%(default), or choose what is appropriate for you.
5. In the Content section, click the Add button (bottom right of the screen) for the column on the left.
6. From the Select portlets page, choose IBM Cognos Content.
7. Check the box for IBM Cognos Navigator, and click the green arrow to apply your selection. This should move IBM Cognos Navigator to the Selected entries box on the right, as shown in Figure 3.40.

Figure 3.40. Create a New Page with two columns.
8. Click OK to proceed.
9. Click the Add link for the column on the right.
10. From the Select portlets page, click the IBM Cognos Content link.
11. Choose IBM Cognos Viewer via the check box.
NOTE: If you had chosen only one column and added two options, that is, IBM Cognos Viewer and IBM Cognos Navigator, they appear one below the other on the screen.
12. Click OK to proceed
13. Click Next to proceed.
14. On the Set Page Style page, you can optionally provide Title and Instructions. For this example you can leave them blank. Also, in the Portlet Style section, you have three check box options. Leave them as-is right now because you need to edit the page to add content. After you finish with the edits, you can hide the edit options because you do not want your users to edit the page.
15. Click Next.
16. Check the box for Add this page to the portal tabs and View the page.
17. Click Finish to complete creating and adding the page.
NOTE: You can also navigate to the SampleOutdoorPortal folder where you created the page and work with the page from there; for example, click the page Finance, which opens the page.
18. In the Cognos Viewer window, click the Edit button on top right of the screen. This opens the Set Properties window for IBM Cognos Viewer.
19. Type in a Title and choose a language (optional).
20. In the Entry section, click the link Select an entry. This enables you to navigate to the report you want to run, for example, SampleOutdoorReports > Product Forecast report, as shown inFigure 3.41.
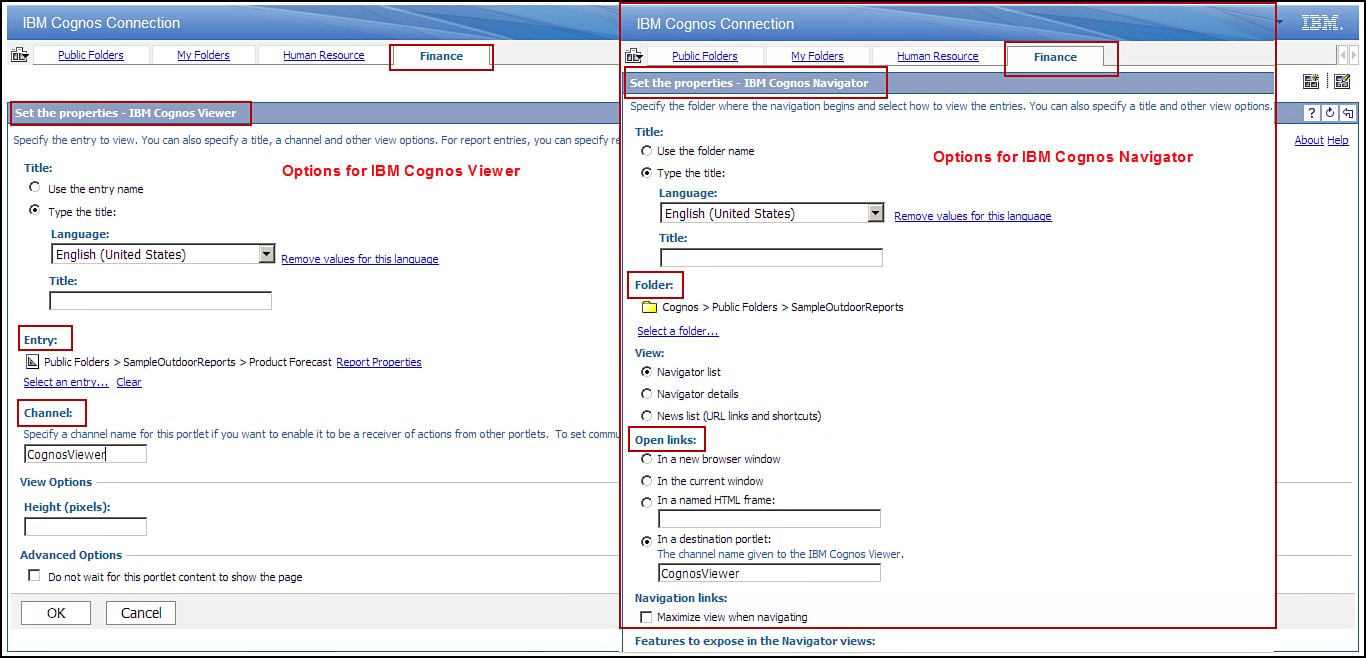
Figure 3.41. IBM Cognos Viewer and IBM Cognos Navigator options/settings.
21. Click the Report Properties link, which displays the Set the Properties – IBM Cognos Viewer.
22. In the Fragment Action section, select the radio button Run the report or the one that is applicable in your situation.
23. Click OK.
NOTE: When the report is run, the report output displays in IBM Cognos Viewer.
24. In the Channel section, type CognosViewer (case-sensitive).
25. Click OK.
26. In IBM Cognos Navigator window (on the left), click the Edit button.
27. In the Folder section, click Select a folder.... link > navigate to Public Folders >SampleOutdoorReports folder > click OK (refer to Figure 3.41).
28. In the Open links section, choose In a destination portlet and type CognosViewer, which should match your previous entry (refer to Figure 3.41).
29. Proceed with defaults, or you may choose the options that your implementation requires.
30. Click OK.
31. IBM Cognos Navigator should display all the reports from the folder you choose, for exampleSampleOutdoorReports and the IBM Cognos Viewer should display the output of the report you chose in step 20 (see Figure 3.42).
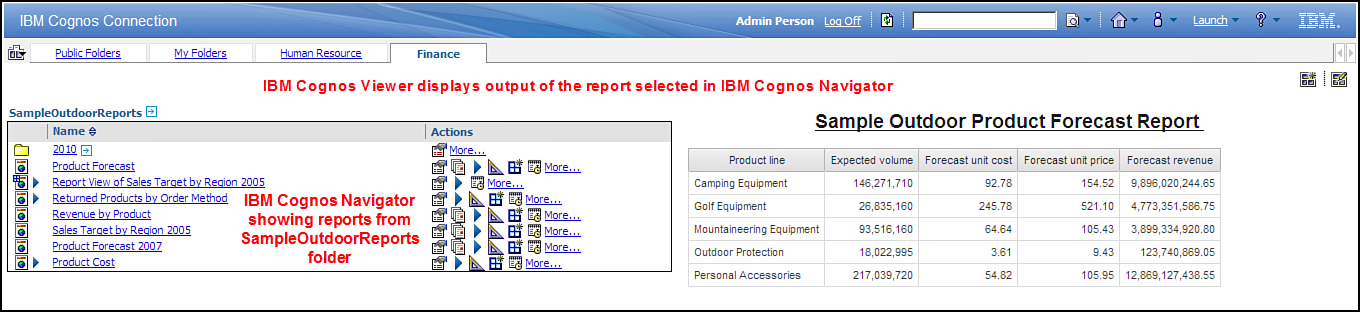
Figure 3.42. Portal Tabs – Final Screen output.
32. Navigate back to the Public Folders > SampleOutdoorPortal folder, and click the Set Properties for the Finance page.
33. Navigate to the Page Style tab, in the Portlet Style section, and check the check box for Hide Borders and Hide Title Bars. (You may keep them if your implementation requires so.)
34. Click OK.
35. Examine that the orders and Titles (for example, IBM Cognos Navigator and IBM Cognos Viewer) do not show up anymore.
NOTE: To remove the Portal tab you have added, click the tab you want to remove, for example,Finance. Click the Tab menu (as shown as option 17 in Figure 3.8). Then select Remove This Taboption.
MY ACTIVITIES AND SCHEDULES
The My Activities and Schedules option is available from the My Area Options > My activities and schedules in IBM Cognos Connection (refer to Figure 3.7).
Options here enable you to view and manage your activities and schedules as well as to see the past activities. From here you can also change the priority of an activity and cancel or suspend them if required.
There are four options available to you here: Current Activities, Past Activities, Upcoming Activities, and Schedules. Each of these options has filters that enable you to define your scope, that is, the date or a date range as well as filter by status. You can set the priority for an upcoming, scheduled, and current activity in the queue. Priority plays a role in assigning activities in the queue based on its assigned priority. If two activities are queued with priority 2 and 5, the one queued with priority 2 will be executed first and then the activity with priority 5. An activity can have a priority between 1 and 5. All activities are created with a default priority of 3, which you can modify to suit your requirement. An activity with priority 1 has a higher priority than an activity with priority 4. Figure 3.43 demonstrates options available for schedules. The layout for Current Activities, Past Activities,and Upcoming Activities is similar; however, the options available for Schedules on the top-right corner of the screen changes as applicable for each option.
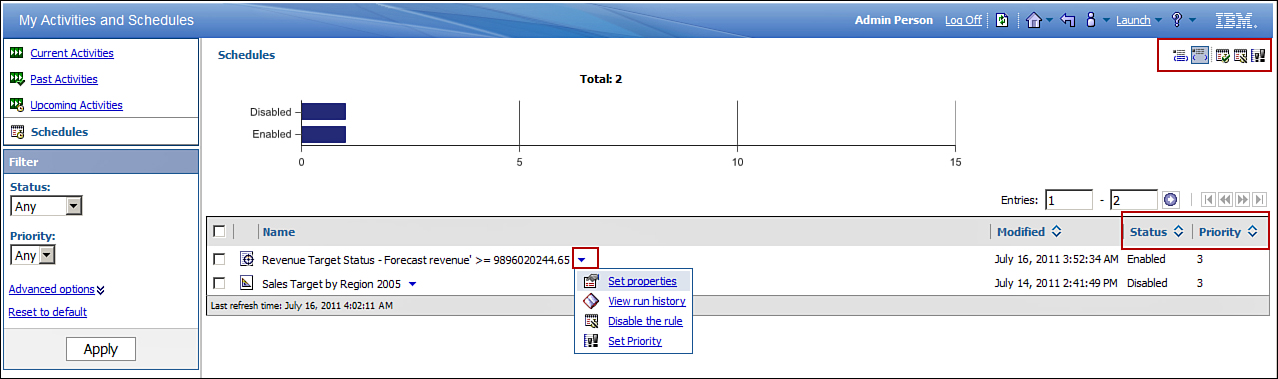
Figure 3.43. My Activities and Schedules in Cognos Connection.
You can modify the priority of a task if you have been granted permissions by the Cognos BI administrator.
Current Activities
Current activities are those that are currently being processed. You can Cancel a current activity,Suspend it, or Release it, or select Set Priority as required via icons available on the top-right corner of the screen. A current activity may be pending in the queue, executing currently, waiting for a non-IBM Cognos job to complete, or suspended. You can monitor current activity by its status or priority. You can monitor current activity by statuses Pending, Executing, Waiting, Suspended, or Any and a priority between 1 and 5.
Past Activities
Past Activities are background activities that have been already processed by IBM Cognos BI. You can see past activity of a report based on a time period, that is, Last 4 hours, Last 8 hours, Last 12 hours,Last 24 hours, Last 7 days, Last 30 days, or Last 365 days. Alternatively, you can define the time period as a date range via the From date To date option. You can check the status of a past activity by the status filter for Succeeded, Failed, Canceled, or Any status. You cannot Cancel, Suspend, Release, or Set Priority of a past activity because these have already been processed.
Upcoming Activities
Upcoming Activities are those scheduled to run at a later time. An upcoming activity may have a status of Scheduled, Canceled, or Suspended. You can check an upcoming activity by date, status, or priority. You can also Cancel, Suspend, Release, Schedule, or Set Priority of an activity from here via icons available on the top-right corner of the screen.
Schedules
The Schedules option enables you to monitor and manage all the activities scheduled for you. You canEnable, Disable, or Set Priority of a schedule from here via icons available on the top-right corner of the screen. You can also monitor schedules by status—that is, Enabled, Disabled, or Any.
CREATE A NEW JOB
A job is a collection of entries consisting of reports, report views, or other jobs. If you need to run multiple entries at the same time, you can create a job and schedule them all to run at that time. For example, you can create a report view for Revenue by Product (Thai), so you can share the same report with your Thai users. You may want to schedule both the Revenue by Product reports for both English and Thai users at the same time. In this case rather than creating two separate schedules for each, you can create a job and schedule them to run at the same time.
To create a job, click the New Job icon (as shown as option 7 in Figure 3.8). You must provide a name and location where you want to create the job. Figure 3.44 shows the options available to you when creating a job, for example, steps, sequence, and so on.
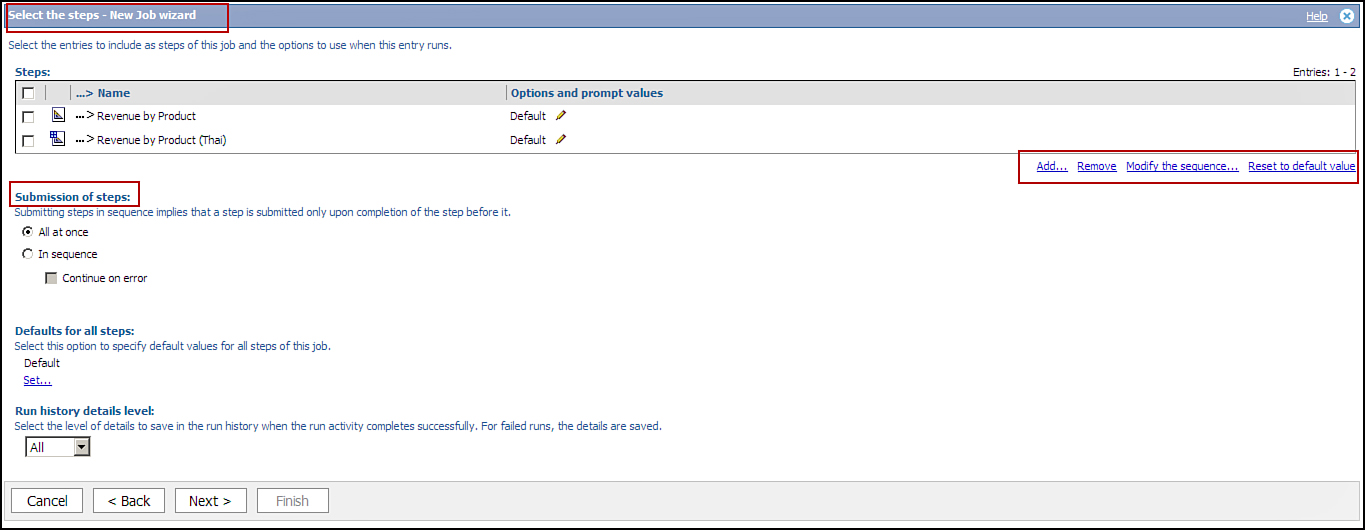
Figure 3.44. Options when creating a New Job in Cognos Connection.
When creating a job you have an option to define the Submission of steps:
• All at once: Submits all the tasks in the job to run at the same time.
• In Sequence: Useful if you want each task in the job to be executed in the sequence they are listed when you created the job, that is, as listed in the Steps section (refer to Figure 3.44). This option is appropriate when you want the next task in the step to be submitted only after the previous step has completed. You can select the check box Continue on Error if you want the job to keep processing even if it encounters an error. If you do not check this box, the process stops on an error.
In addition, you can define the Default options for each step:
• Report Options: You can specify options such as Run the Report to and choose from Produce report outputs or Refresh the cache, report Format, PDF options, Accessibility options, Languages,Delivery, and Printer location, and enable report distribution via Bursting.
• Import Options: This is applicable to tasks that relate to imports. You can specify if you want toUpgrade all report specifications to the latest version or Keep the existing report specification versions (default). You have access to this option if you are a Cognos BI administrator or have been explicitly granted permission to use this option.
• Index Update Options: Enables you to specify the default values for all the index updates of this job. The indexes are used by the Search option. You can specify the scope of indexing to only those entries that have changed since the last time the indexes were updated or to completely rebuild the indexes. You can choose from one of the two options available to you: Only entries that have changedor All entries. You have access to this option if you are a Cognos BI administrator or have been explicitly granted permission to use this option.
You can choose to get All or Limited for the options Run history details level for jobs completed successfully. For jobs that fail, a detailed level of information is saved.
You can change the sequence in which the tasks are executed in a job at a later date via the Modify the Sequence option.
You can define for the Action option Save and run once, Save and Schedule, or Save only.
If you choose the option Save and Schedule, after you click the Finish button, the schedule window appears enabling you to define the schedule and frequency for the job, similar to the one shown previously in Figure 3.14.
GLOBALIZATION
Cognos 10.2 brings new globalization features that include new languages in Cognos BI (such as Croatian and Kazak), additional language support for Mobile Server and iPad client (for example, Thai), and samples now available in additional languages (for example, Czech, Turkish, and so on).
Some of the globalization features are as follows:
• Bidirectional Language Support: As discussed earlier, this option now enables you to use bidirectional languages such as Hebrew, Arabic, Urdu, and Farsi. To enable BiDi (bidirectional support), log on to IBM Cognos Connection. Click My Area Options > My Preferences > navigate to the General tab> select the checkbox Enable bidirectional support > specify base text direction for content, for example, Right-to-Left or Left-to-Right, or Contextual.
• Unicode Supplementary Character Support is now available as listed in the following:
• CJK Unified Ideographs Extension B (20000–2A6DF).
• CJK Unified Ideographs Extension C (2A700–2B73F).
• CJK Unified Ideographs Extension D (2B740–2B81F).
• CJK Compatibility Ideographs Supplement (2F800–2FA1F).
• Currencies and data format is also available for Arabic, African, and so on.
SKIN MANAGEMENT
You can change the default look and feel of the IBM Cognos portal and create custom Cognos Connection skin. Some standard options are available to you from the My Preferences > General tab > Style option. You can choose from one of the standard styles: Corporate (default), Business,Classic, Contemporary, Modern, or Presentation.
For additional information on Cognos Connection skin management, refer to Chapter 13, “Maintaining Your IBM Cognos BI Application.”
IN A NUTSHELL: REVIEWING BY IBM COGNOS BI AUDIENCE
Depending on your role on an IBM Cognos BI project implementation, you may be interested to know those aspects of IBM Cognos Connection that relate to you. Review IBM Cognos Connection by role at a high level.
Architect Perspective
Architects are usually responsible for the overall technical implementation of the BI solution and the details of how different pieces of the solution interact with each other. You should pay close attention to the solution that needs to be designed and integrated. There are several factors that come into play and if not addressed in the early phases of the project may become project risks. Some of the key questions that you may want answered early follow:
• Will IBM Cognos Connection be exposed to the end users, or does it integrate with other business applications from where the Cognos reports will be consumed?
• Which applications are those? Is the integration feasible or is Cognos Software Development Kit required? Is Cognos SDK used on the project?
• Will IBM Cognos Connection be used out-of-the-box or does it require customization? For the look and feel of the UI, Company logo, and so on, have these requirements been captured, scoped, and approved by stakeholders?
• Will all the links and capabilities be exposed to everyone or will some need to be hidden? Which features are not required and by whom?
• Are there requirements for scheduling, notification, and alert? Is the infrastructure in place to support it? Is there a sufficient number of licenses to support the users identified to consume Cognos reports?
Project Manager Perspective
Project Managers are interested in knowing what tasks are specifically UI-related. Does the Cognos UI integrate with client’s other business applications? If yes, who is responsible for those systems? What are the related tasks, skills, and resources required to implement the integration tasks? Which phase do these belong to? Here are some points to consider:
• If Cognos is used as a stand-alone application, typically it is considered a simpler implementation. However, if it needs to integrate with other business applications, you must work with the Architect to understand the feasibility. Although integration tasks are not difficult (always), it requires resources with appropriate skills that you must ensure you have on your plan, as well as ensure the supported versions of other applications that Cognos will integrate with. Because this task also involves working across teams, that make scheduling and availability a bigger challenge than integration. That said, you must ensure you have identified the resources and scheduled their time in the project plan.
• Consult your BI Architect on the proposed implementation plan; some integration tasks require the Cognos Software Development Kit to develop the code. This is typically seen when Cognos Connection by itself is not exposed. Ensure resources on your team have Cognos SDK skills.
• IBM Cognos Connection provides many powerful options to manipulate Cognos content, ensure that the requirements are clearly understood, and map to a WBS on the project plan. It is common depending upon the implementation, training plans, and end users that some options in Cognos Connection are not exposed to end users in general or exposed depending on their roles and responsibilities. The look and feel should be clearly scoped and approved during the requirements phase. Not all GUI tasks are security-related, for example, adding portal pages, changing the color of the portal, adding a company logo, so the tasks will be spread out across teams and phases.
Business Analyst Perspective
Business Analysts should ensure that you capture the customer’s requirement on the user interface look and feel of the application clearly and understand their expectations around integration with other business applications and processes. Some of the commonly seen requirements around user interface are to include the company logo in Cognos Connection or have a different landing page for different user groups, for example, HR, Marketing, and if all the links should be exposed, for example, email, alerts, and more. Some of the key requirements to gather follow:
• Will the users consume Cognos reports by logging in to Cognos Connection or will they be indirectly consumed through another business application? What is the customer’s expectation?
• If integration is required, what is the expectation for the usage of the Cognos portal and its content?
• Who is the audience of the reports? Does everyone sees everything or do certain people see certain parts of the application depending on their functional role within the organization? Are there users who perform ad-hoc querying? Are these the same people who build self-service or managed dashboards? It is a common requirement that the look and feel of the user interface varies based on the user’s role and responsibility. You must spend time to understand the customer’s expectation for this. This can help the team identify tasks and map to WBS correctly in the project plan.
• Which groups of people see the content, that is, reports, folders, scorecards, Studios, and so on? For example, does HR need to see only HR reports, or can it access some general reports and other content? This information directs the design of the user interface that is required to be built.
• Will IBM Cognos BI integrate with other business applications? If yes, which ones? You must work closely with the BI Architect to understand the integration points. It is a common requirement to create and expose links for Cognos in the business application based on people’s roles and responsibility in the organization and the subset that has been identified to use Cognos.
• Are all reports on-demand or do some need to be scheduled to run off-peak hours? Is there a requirement for users to create their own scheduled tasks, or is it created by the Cognos BI Administrator?
Developer Perspective
Developers must thoroughly understand the requirement for the look and feel of the interface. Some of your design work may need to take into account these requirements; for example, are there predefined filters and calculations that are standard and exposed to the users, or do you need to take these into consideration in the development work you are doing? Because there are usually several ways to implement a solution, you should give careful thought to the best way to implement your solution. Take into account the best practices, refer to the IBM Cognos BI proven practices, and choose the best route. You should give careful consideration to some of the points highlighted here:
• Is there a requirement to create additional portal pages to implement the solution or is everything created and exposed from Public Folders?
• Is there a need to create additional pages, folders, and shortcuts and locate them elsewhere for security? You should work closely with the Architect and Business Analyst to ensure the customer expectations are being clearly met.
• Do you need to deliver the as-is out-of-the-box Cognos portal, or are there requirements for hiding some features? Will all users see every link and feature in Cognos Connection? How will they access the reports and other Cognos Content you develop? Some of your design may be guided by the answers to these questions.
• Do you have a choice to make between easy to implement and easy to maintain? Discuss your options with the BI Architect, BI Administrator, or other stakeholders, if required.
• How do you plan to handle drill-through reports? Do you plan to hide them in Cognos Connection and allow usage from within the report only?
• Is there a requirement for end users setting up alerts and comments in the report? Is the report in HTML format?
End User Perspective
End Users should understand the solution built for them. If you are new to using IBM Cognos BI, you must identify and seek training opportunities that help you along the way. IBM Cognos Connection is your entry point to using Cognos content; your familiarity with the portal can help you easily navigate to the content and features you need to use. There are some new features available to you for collaboration and event management that can help you track business events. Discuss with your BI Architect/Business Analyst to identify and explore the opportunities available to break away from traditional, manual day-to-day activities by leveraging automated features. Some of the things you should think about, as a starting point, are listed here:
• Do you see all the reports, dashboards, and other content that you should have access to?
• Where are the reports, dashboards, and so on in the IBM Cognos BI interface? Do you and your teams have access to that location and content?
• Do you have a need to schedule your reports to run later?
• Do you need to send reports via email from within Cognos?
• Are you expected to notify others when some critical information changes or business event occurs?
• Do you need to create, assign tasks, and follow them through completion from within the Cognos BI environment?
• Will you and your team benefit by leveraging collaboration features for the BI work you perform?
• Do you need to save your report in PDF, HTML, or any other format such as Excel? Do you have requirements to take your report to Microsoft PowerPoint from Cognos?
IBM Cognos BI Administrator Perspective
IBM Cognos BI Administrators should work together with the team to guide it to build a robust solution. There are many situations when a choice must be made between easy to implement and easy to maintain; you can help the team make the right decision based on the infrastructure, unique customer situation, and culture. Some of the points worth considering follow:
• Are there additional images that will be used on the Cognos portal, for example, a company logo? Are these customer-approved images?
• What is the scope and requirement for the look and feel of Cognos Connection? Does the skin need to change?
• Does implementing the look and feel requirement involve working with and changing the .xml files? Is there a workaround?
• Should all links in the IBM Cognos BI interface be visible to all users?
• Is there a requirement for shared pages to allow different groups of users to share contents with each other?
• Will Public Folders be exposed to the users, or will public content be on a shared page?
• Will the end users save their reports in the Content Store or as flat files only or both? Which icons and links are available to them in Cognos Connection?
• Is there a requirement for users to email reports to themselves or others from the Cognos environment? Which group of users requires this? Some or all?
This is very length and depth content Cognos TM1 Online Course Hyderabad
ReplyDeleteYou are totally right. This post actually made my day. You can not imagine just how much time I
ReplyDeletehad spent for this info! Thanks!
KissAnime alternative
very nice post.
ReplyDeletethank you for sharing your knowledge with us,keep sharing more posts.
cognos training
Too good article,keep sharing more posts with us.
ReplyDeletethank you..
cognos tm1 online training
I really liked your blog article. Great.
ReplyDeleteJava online online training
Machine learning online online training
Magento online online training
MySql Admin online online training
MYSQL online online training